The Sonoff S26 R2 WIFI Smart Plug
The Sonoff S26 R2 WiFi Smart Plug is a 1 channel relay board equipped with an ESP8266. It can be programmed with an USB-TTL adapter and the Arduino IDE.

The Board
The microcontroller is an ESP8266-EX and can be programmed with the Arduino IDE. I use the settings of the "Generic ESP8266 Module" for the upload.
The relay is connected to GPIO12. The output is HIGH active. The relay will not interfere on startup. In parallel there is a red LED as indicator if the relay is on or off. Additionally there is a blue LED connected to GPIO13 (HIGH active). The push button is connected to GPIO0 (flash).
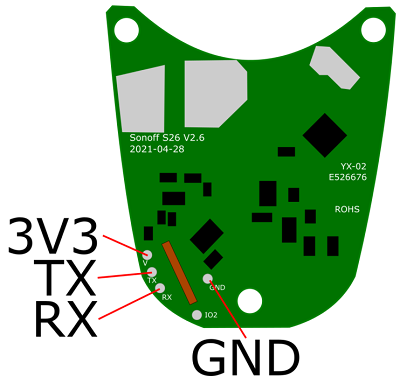
RX, TX, IO2, 3V3 and GND are available on test pads. Which will be used to program the board.
The board will be supplied by the internal AC/DC power supply.
The Standard Software of the Sonoff S26R2
The Sonoff S26R2 comes with an OEM program to be used with the app eWeLink from Sonoff. There are several software alternatives available (Tasmota, ESPHome, ESPEasy, OpenMQTTGateay,…). This page focuses on flashing YOUR OWN SOFTWARE on the Sonoff S26 R2.
How to program the Sonoff S26 R2
- WARNING: This devices handles MAINS electric and will kill you or others if you do something wrong. Take special care when you handle with this device.
- NEVER connect the device to MAINS electric when it is OPEN.
- NEVER connect the device to MAINS electric and your programming device in parallel. You will destroy your PC or harm yourself.
- Before you continue: UNPLUG the device from mains electric NOW.
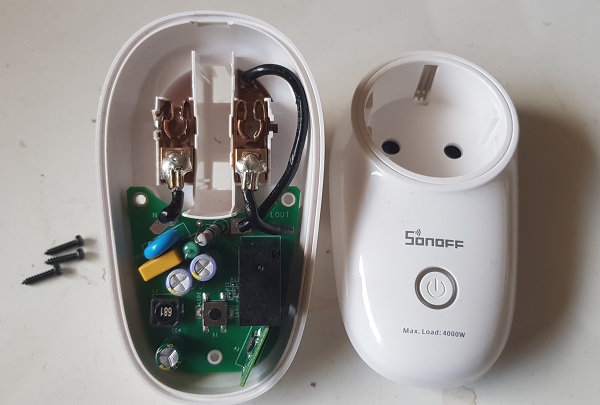
To open the enclosure unscrew the 3 screws on the back and open the socket:
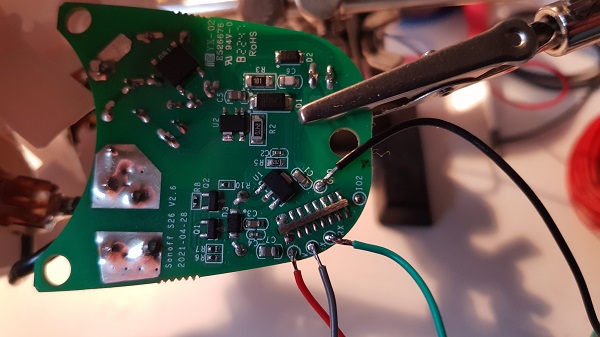
The board can be programmed when you connect a USB-TTL to the respective test pads. RX/TX/GND and 3V3 are available on soldering pads. Connect the your FTDI USB TTL programmer with the ESP.
I had not so much success with alligator clips. In the end I soldered wires to the board for programming purpose.
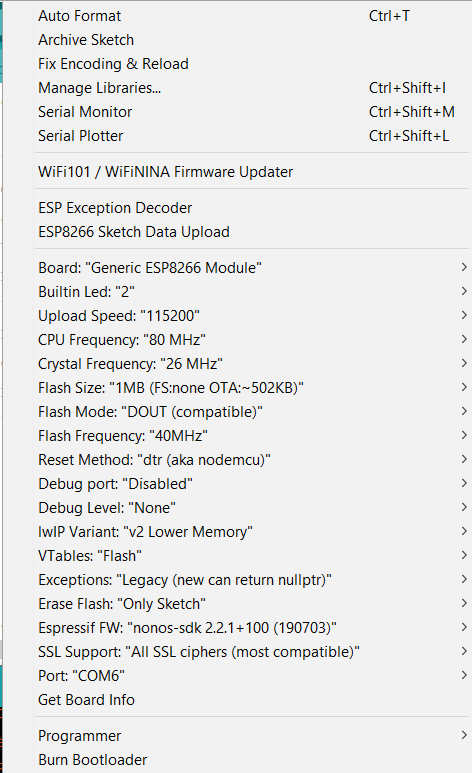
For the Sonoff S26R2 set following settings in the Arduino IDE:
To bring the ESP8266 into flash mode I start with a disconnected 3V3 line, compile the sketch in the Arduino IDE and wait for the running dots:
esptool.py v2.8
Serial port COM6
Connecting...
Then I follow this sequence:
- press and hold GPIO0 (flash) button
- connect the 3V3 line
- release GPIO0 (flash) button
Afterwards the upload of the sketch begins.
A simple Demo Sketch
I have put together a generic demo sketch. It is a simple ESP32 webserver to switch the relays on or off. You can download this sketch at the end of this page.
The sketch offers several hardware variants / pin mappings and you must set the respective board in the main tab. The predefined pin mapping for this relay board is 26.
#define USE_BOARD 26 // the Sonoff S26 R2
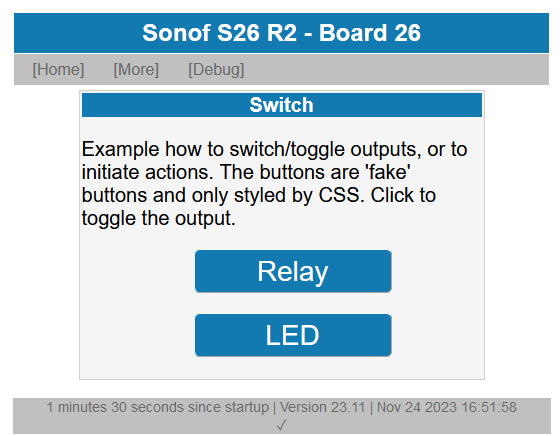
The start page will show two buttons:
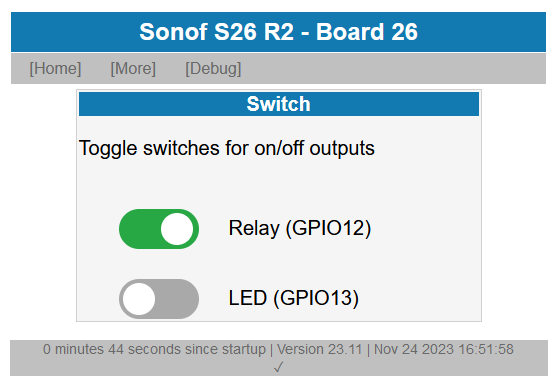
Page 1.htm offer simple toggle buttons to switch the relay and the separate LED.
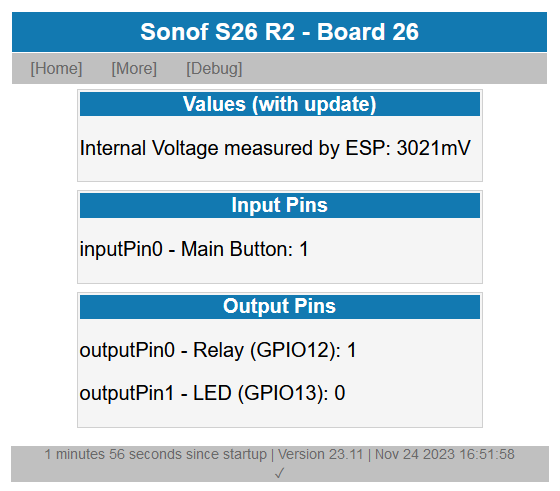
Page 9.htm is just for debugging. It shows the states the relay and the LED
This smart WiFi socket switch doesn't offer PWM outputs, so instead of an array set following precompiler #define:
#define NO_PWMPIN
You could use GPIO13 to indicate WiFi activity. If not needed, leave the value for this constant to 255.
const uint8_t wifiActivityPin = 13; // set to 255 if activity LED is not needed
Don't forget to either set your WiFi credentials or include your settings in the main tab.
This concludes the configuration of the Sonoff S26 R2
Note: This generic webserver sketch is compatible for ESP8266 and the ESP32, hence the precompiler defines to differentiate the boards based on your upload settings. If you want to read more about the generic ESP webserver sketch - see this page: Simple ESP webserver.
Pricing of the Sonoff S26 R2
I got two units for about 25 EUR. If you need a final product with a professional enclosure DIY is no alternative.
Summary for the Sonoff S26 R2 Wifi Smart Switch
This 1 channel relay board is a compact solution if you just need one simple relays driven by an ESP8266.The microcontroller is an ESP8266 EX and can be programmed with the Arduino IDE.