The Atorch AT24 DT24 UD18 Power Meter Family
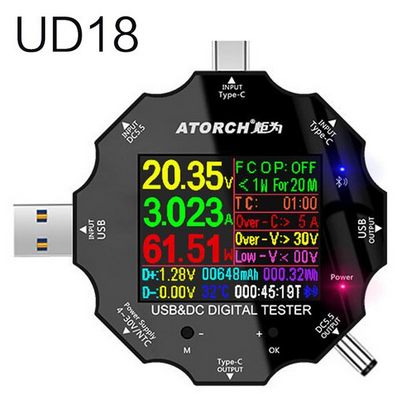
Atorch provides several power meters with serial interfaces. Usually you can read the values with bluetooth and an app on your smartphone but some devices also offer a serial output so you can connect a microcontroller like an Arduino or an ESP8266/ESP32 to retrieve the measured data.
The sensor sends data permanently via serial interface. This page not only shows how to read this kind of serial device, but also how to read the variable size messages in general.

Atorch AT24 DT24 UD18 Protocol Basics
The Atorch protocol is an unencrypted protocol. Each line begins with two start bytes 0xFF and 0x55 followed by a message type, device type and variable length of payload. The last byte is as checksum. There is no dedicated end marker and the message length can differ depending on the message type, which makes parsing of the message tricky.
FF 55 01 03 00 01 F3 00 00 00 00 06 38 00 00 03 11 00 07 00 0A 00 00 00 12 2E 33 3C 00 00 00 00 00 00 00 4E
Parsing of Data - Some words to the Strategy
Like in most of my serial interface examples I'm following the tutorial "Serial Input Basics" as it gives a nice start for a reliable communication.
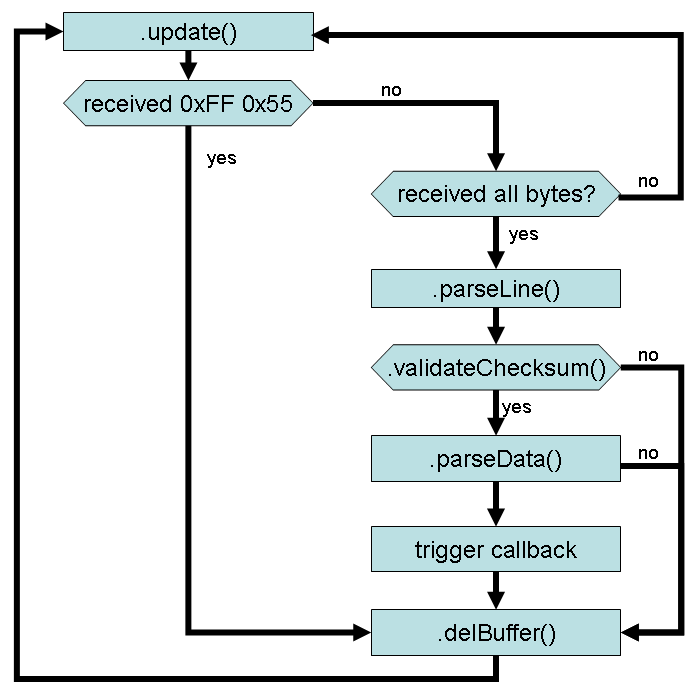
The function update() reads incoming bytes. The message doesn't contain a dedicated end tag. Each message starts with 0xFF 0x55 in the first two bytes and this is the only possibility to recognize a new message. Therefore we check continuously the stream for the sequence 0xFF 0x55 and will "restart" each time this sequence was received. This strategy might break an incoming packet if there is some data containing these values (decimal: 65365). Each incoming byte will be stored and the index (ndx) will be incremented. Consecutive data will be added to the receive buffer (receiveChars).
If we have collected the necessary amount of bytes according to the protocol definition parseLine() will be called.
parseLine() calls validateChecksum to verify if the received checksum is correct.
If the checksum is correct the data will be parsed.
If the data is correct and a callback function was defined the callback will be called.
Afterwards the current buffer will be deleted and the index (ndx) resetted to 0.
The microcontroller is ready to receive a new message from the device.
Member Functions of the Atorch Class

I decided to implement the Atorch device as class with following public member functions:
.update() call this method in loop(). It will read available data on the Serial interface and update the distance value accordingly. Each time update() is called only one byte is readed from the serial interface. But as update() is called over and over again in loop it will read the whole message. One advantage is, that a malfunction serial device can't block the execution of update() by flooding data.
Additionally you can define a callback function in your sketch. This callback function will be called, when the transmission of new data was completed.
.setOnNewData(callbackOnNewData) will inform the class to call "callbackOnNewData()" whenever the data was updated completely. Obviously you must define the function callbackOnNewData() in your user sketch.
All values of the payload are available with public member variables. I was just to lazy to write getter functions for each single variable.
The Example Sketch
The most important part in the example sketch is the class Atorch. The other functions are just to get the print out.
/*
   Atorch
   https://github.com/NiceLabs/atorch-console/blob/master/docs/protocol-design.md

   Serial Receive Example
   two byte start / header,
   Message Type, Variable Payload,
   Checksum
   no end character

   Valid telegram
   FF55010100090400000E0000040000000000006401F40085002F00000A093C0000000039
   FF55010200011A00003C0004D40000002000006400000000002600590D363C00000000F0
   FF55010200011A0000000004D40000002000006400000000002A00590E343C000000003F
   FF55010200011A00003C0004D40000002000006400000000002600590D363C00000000F0
   FF5501030001F3000000000638000003110007000A000000122E333C000000000000004E

   by noiasca
   2022-04-01 https://forum.arduino.cc/t/softwareserial-binar-daten-lesen/975779/5
*/

class Atorch {
  protected:
    static const byte numChars = 36;   // receiver buffer size
    byte receivedChars[numChars];      // an array to store the received data
    byte ndx = 0;                      // length of received message
    boolean newData = false;           // flag to indicate when new data is complete
    Stream &stream;                    // a reference to the serial interface
    void (*cbOnNewData)();             // gets called after we received a full message

    void delBuffer()
    {
      memcpy(receivedChars, "", sizeof(receivedChars));
      ndx = 0;
    }

    void debugDataHex()
    {
      for (size_t i = 0; i < ndx; i++)
      {
        if (receivedChars[i] < 0x10) Serial.print('0');
        Serial.print(receivedChars[i], HEX);
        Serial.print(' ');
      }
      Serial.println();
    }

    void parseData()                   // parse data and store to internal variables
    {
      deviceType = receivedChars[3];
      if (deviceType == 1 || deviceType == 2 || deviceType == 3)
      {
        voltage = ((uint32_t)receivedChars[4] << 16 ) + (receivedChars[5] << 8) + receivedChars[6];
        amp = ((uint32_t)receivedChars[7] << 16 ) + (receivedChars[8] << 8) + receivedChars[9];
        wh = ((uint32_t)receivedChars[0x0D] << 24 ) + ((uint32_t)receivedChars[0x0E] << 16 ) + (receivedChars[0x0F] << 8) + receivedChars[0x10];
      }
      if (deviceType == 1)
      {
        price = ((uint32_t)receivedChars[0x11] << 16 ) + (receivedChars[0x12] << 8) + receivedChars[0x13];
        frequency = (receivedChars[0x14] << 8) + receivedChars[0x15];
      }
      if (deviceType == 1 || deviceType == 2)
      {
        watt = ((uint32_t)receivedChars[0x0A] << 16 ) + (receivedChars[0x0B] << 8) + receivedChars[0x0c];
        powerfactor = (receivedChars[0x16] << 8) + receivedChars[0x17];
        temperature = (receivedChars[0x18] << 8) + receivedChars[0x19];
        hour = (receivedChars[0x1A] << 8) + receivedChars[0x1B];
        minute = receivedChars[0x1C];
        second = receivedChars[0x1D];
        backlight = receivedChars[0x1E];
      }
      if (deviceType == 3)
      {
        ah = ((uint32_t)receivedChars[0x0A] << 16 ) + (receivedChars[0x0B] << 8) + receivedChars[0x0c];
        usbdminus = (receivedChars[0x11] << 8) + receivedChars[0x12];
        usbdplus =  (receivedChars[0x13] << 8) + receivedChars[0x14];
        temperature = (receivedChars[0x15] << 8) + receivedChars[0x16];
        hour = (receivedChars[0x17] << 8) + receivedChars[0x18];
        minute = receivedChars[0x19];
        second = receivedChars[0x1A];
        backlight = receivedChars[0x1B];
      }
    }

    bool validateChecksum()            // validate if checksum of telegram is correct
    {
      //return true;                   // for debugging only: return with OK
      int result = 0;
      for (int i = 2; i < ndx - 1; i++)
      {
        result += receivedChars[i];
        result &= 0xFF;
      }
      result ^= 0x44;
      //Serial.print(F("calculated checksum ")); Serial.println(result, HEX);
      if (result == receivedChars[ndx - 1])
        return true;
      else
        return false;
    }

    void parseLine()                   // process a telegram
    {
      //Serial.print(F("I101: This is just in:")); Serial.println(receivedChars);         // output all - ASCII
      Serial.print(F("I102: This is just in:")); debugDataHex();                          // output all - HEX
      if (validateChecksum())
      {
        parseData();
        if (cbOnNewData) cbOnNewData();
      }
    }

  public:
    byte messageType = 0;
    // payload data
    byte deviceType = 0;
    uint32_t voltage = 0;
    uint32_t amp = 0;
    uint32_t ah = 0;          // deviceType 3
    uint32_t watt = 0;
    uint32_t wh = 0;
    uint32_t price = 0;
    uint16_t frequency = 0;   // deviceType 1
    uint16_t powerfactor = 0; // deviceType 1
    uint16_t usbdminus = 0;   // deviceType 3
    uint16_t usbdplus = 0;    // deviceType 3
    int16_t temperature = 0;
    uint16_t hour = 0;
    uint8_t minute = 0;
    uint8_t second = 0;
    uint8_t backlight = 0;

    Atorch (Stream &stream) : stream(stream)
    {
      delBuffer();
    }

    void setOnNewData(void (*cbOnNewData)())     // set a callback function. Gets called when new data was received
    {
      (*this).cbOnNewData = cbOnNewData;
    }

    void update()                                // run this member function in loop()
    {
      constexpr byte startMarker = 0xFF;         // start flag
      constexpr byte secondMarker = 0x55;
      if (stream.available() > 0) {
        char rc = stream.read();
        // restart on FF 55
        if (ndx > 0 && receivedChars[ndx - 1] == startMarker && rc == secondMarker)
        {
          delBuffer();
          receivedChars[0] = startMarker;
          receivedChars[1] = rc;
          ndx = 2;
        }
        else
        {
          receivedChars[ndx] = rc;
          if (ndx == 2) messageType = rc;
          ndx++;
        }

        // parse data on reached packet length
        if (messageType == 1 && ndx == (2 + 1 + 32 + 1)) parseLine();

        // sanity check
        if (ndx >= numChars) delBuffer();
      }
    }
};

// create the sensor object and hand over the Serial interface to use:
HardwareSerial &mySerial = Serial;
Atorch device(mySerial);                  // use Hardware Serial (for example for testing with the PC)

//#include <SoftwareSerial.h>             // on an Uno you can use SoftSerial
//SoftwareSerial mySerial(2, 3);          // RX, TX
//Atorch device(mySerial);                // on an UNO you will need SoftSerial to connect to the device

// On a Mega you can simply use
// a Reference to an existing HW Serial:
//HardwareSerial &mySerial = Serial1;
//Atorch device(mySerial);

void output()                           // simple output of data
{
  Serial.print(F("deviceType= ")); Serial.print(device.deviceType); Serial.println();
  if (device.deviceType == 1 || device.deviceType == 2)
  {
    Serial.print(F("voltage=    ")); Serial.print(device.voltage / 10.0); Serial.println('V');
    Serial.print(F("amp=        ")); Serial.print(device.amp / 1000.0); Serial.println('A');
    Serial.print(F("watt=       ")); Serial.print(device.watt / 10.0); Serial.println('W');
    Serial.print(F("wh=         ")); Serial.print(device.wh / 100.0); Serial.println(F("Wh"));
    Serial.print(F("price=      ")); Serial.print(device.price / 100.0); Serial.println(F("/KWh"));
  }
  if (device.deviceType == 1)
  {
    Serial.print(F("powerfactor=")); Serial.print(device.powerfactor / 1000.0); Serial.println();
    Serial.print(F("frequency=  ")); Serial.print(device.frequency / 10.0); Serial.println(F("Hz"));
  }
  if (device.deviceType == 3)
  {
    Serial.print(F("voltage=    ")); Serial.print(device.voltage / 100.0); Serial.println('V');
    Serial.print(F("amp=        ")); Serial.print(device.amp / 100.0); Serial.println('A');
    Serial.print(F("ah=         ")); Serial.print(device.ah / 1000.0); Serial.println(F("Ah"));
    Serial.print(F("wh=         ")); Serial.print(device.wh / 100.0); Serial.println(F("Wh"));
    Serial.print(F("usbdminus=  ")); Serial.print(device.usbdminus / 100.0); Serial.println();
    Serial.print(F("usbdplus=   ")); Serial.print(device.usbdplus / 100.0); Serial.println();
  }
  Serial.print(F("temperature=")); Serial.print(device.temperature); Serial.println('C');
  Serial.print(F("durance=    ")); Serial.print(device.hour); Serial.print(':'); Serial.print(device.minute); Serial.print(':'); Serial.println(device.second);
  Serial.print(F("backlight=  ")); Serial.print(device.backlight); Serial.println();
}

void timerOutput()                     // a timer to output data to serial
{
  static uint32_t previousMillis = 0;  // time management
  const uint16_t interval = 3000;      // interval to display data
  if (millis() - previousMillis >= interval)
  {
    previousMillis = millis();
    output();
  }
}

void setup() {
  Serial.begin(9600);
  mySerial.begin(9600);
  //device.setOnNewData(output);  // register a callback function which gets called when a new telegram was received
}

void loop() {
  device.update();                // you must call the .update() method in your loop()
  timerOutput();
}
How to Test
In the code you will see some (deactivated) debug messages. You can activate them if you encounter a problem with the device communication.
Variants of the Serial Interface
I like to have several options about how to communicate with a device. During development and first tests on an UNO I would use the Serial interface on pin 0 and 1 of the Arduino. Therefore I declare a reference to the Hardware Serial and just use mySerial in the sketch:
HardwareSerial &mySerial = Serial;
Atorch device(mySerial);                  // use Hardware Serial (for example for testing with the PC)
In a productive system where soft serial is used for other communication also, I would use soft serial:
#include <SoftwareSerial.h>             // on an Uno you can use SoftSerial
SoftwareSerial mySerial(2, 3);          // RX, TX
Atorch device(mySerial);                // on an UNO you will need SoftSerial to connect to the device
On an Arduino Mega or a microcontroller with more hardware serial interfaces you can simply use a reference to an existing Serial:
HardwareSerial &mySerial = Serial1;
Atorch device(mySerial);
Disclaimer
Don't expect a perfect example - but in my opinion it should work very reliable including the checksum calculation.