Fun with millis(): Dimm LEDs Up and Done by Button Press (Fading LEDs) with an Arduino

In this series I want to show short snippets of code around millis(). Here we will use millis() to control the dimming of a LED (fading). When you press (and hold) a button a LED should dimm up. When you releae the button the LED will remain it's current brightness. If you press the button again, the LED will dimm down.
You could use delay to slow down the fading, but as the series is called "Fun with millis()" we will write a non blocking code based on millis(). Furthermore this method enables you to dimm several LEDs in near parallel.

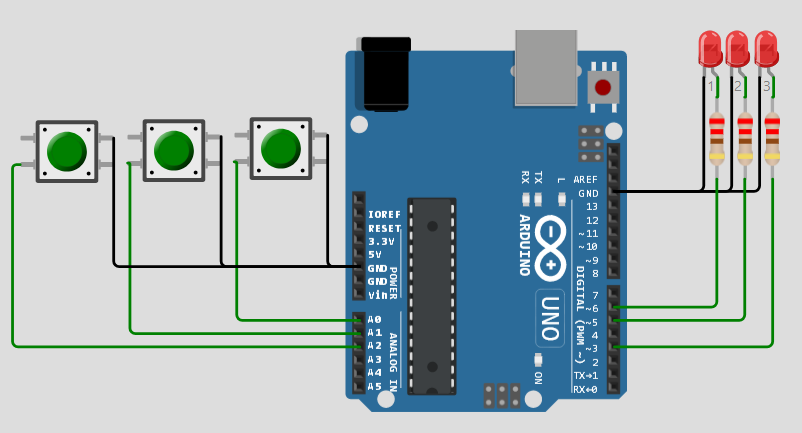
The Dimm Circuit
For this sketch we will use 3 push buttons and 3 LEDs connected to the Arduino.
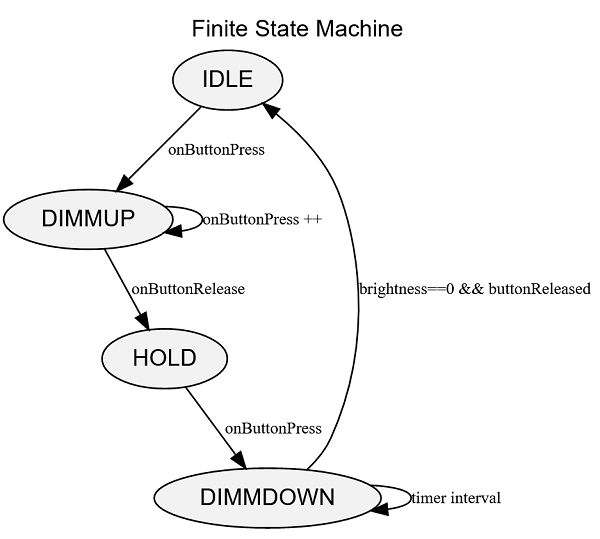
A Finite State Machine
We want to follow the LED a specific sequence of button events. Therefore we define a finite state machine with following states:
IDLE,      // wait for button press
DIMMUP,    // push and hold button results in fade in (stop at max)
HOLD,      // stay in setted brightness
DIMMDOWN   // press button second time results in fade out (stop at light off)
Lets draw a diagram:
These states are a good example for an enumeration. You can use these state names in your sketch - the compiler will assign numbers for each element in the enumeration. Adding new states becomes very easy - and you don't need to remember if a particular state is assigned with number 2 or 3. To be able to have several enumerations in the sketch with the same or similar enumerators, we can give a name.
    enum State {
      IDLE,                          // wait for button press
      DIMMUP,                        // push and hold button results in fade in (stop at max)
      HOLD,                          // stay in setted brightness
      DIMMDOWN                       // press button second time results in fade out (stop at light off)
    };
As naming convention I let start the enumeration it with a capital letter. Then we need a variable to store the current state. It can be defined as
State state;
The enumeration and the variable can be combined as
    enum State {
      IDLE,                          // wait for button press
      DIMMUP,                        // push and hold button results in fade in (stop at max)
      HOLD,                          // stay in setted brightness
      DIMMDOWN                       // press button second time results in fade out (stop at light off)
    } state;                         // define one variable
A Dimm Object
As we will need several variables for each button/LED and some member functions, we write a Dimmer class.
/*
  fade PWM pins

  https://forum.arduino.cc/t/1-button-1-led-fade/1113139/4
  2023-04-10 by noiasca
  to be deleted: 2023-06
  code in forum
*/

// a class for one button, one LED, one Relay
class Dimmer {
    const uint8_t buttonPin;         // the input GPIO, active LOW
    const uint8_t ledPin;            // the output GPIO, active HIGH, must be a PWM pin
    uint8_t brightness = 0;          // current PWM for output pin
    uint32_t previousMillis = 0;     // time management
    enum State {
      IDLE,                          // wait for button press
      DIMMUP,                        // push and hold button results in fade in (stop at max)
      HOLD,                          // stay in setted brightness
      DIMMDOWN                       // press button second time results in fade out (stop at light off)
    } state;
    const uint8_t intervalUp = 50;   // up interval / debounce button
    const uint8_t intervalDown = 10;

  public:
    Dimmer(uint8_t buttonPin, uint8_t ledPin) : buttonPin{buttonPin}, ledPin{ledPin}
    {}

    void begin() {                         // to be called in setup()
      pinMode(buttonPin, INPUT_PULLUP);
      pinMode(ledPin, OUTPUT);
    }

    // just a function to print debug information to Serial
    void debug() {
      Serial.print(ledPin); Serial.print(F("\t")); Serial.print(state); Serial.print(F("\t")); Serial.println(brightness);
    }

    void update(uint32_t currentMillis = millis()) {   // to be called in loop()
      uint8_t buttonState = digitalRead(buttonPin);
      switch (state) {
        case State::IDLE :
          if (buttonState == LOW) {
            previousMillis = currentMillis;
            brightness = 1;
            analogWrite(ledPin, brightness);
            debug();
            state = State::DIMMUP;             // switch to next state
          }
          break;
        case State::DIMMUP :
          if (currentMillis - previousMillis > intervalUp) {
            if (buttonState == LOW) {
              previousMillis = currentMillis;
              if (brightness < 255) brightness++;  // increase if possible
              debug();
              analogWrite(ledPin, brightness);
            }
            else {
              state = State::HOLD;                // button isn't pressed any more - goto to next state
            }
          }
          break;
        case State::HOLD :
          if (currentMillis - previousMillis > intervalDown) {
            if (buttonState == LOW) {
              previousMillis = currentMillis;
              if (brightness > 0) brightness--;  // decrease if possible
              analogWrite(ledPin, brightness);
              debug();
              state = DIMMDOWN;                  // goto next state
            }
          }
          break;
        case State::DIMMDOWN :
          if (currentMillis - previousMillis > intervalDown) {
            previousMillis = currentMillis;
            if (brightness > 0) brightness--;
            analogWrite(ledPin, brightness);
            debug();
            //if (brightness == 0) state = State::IDLE;  // go back to IDLE
            if (brightness == 0 && buttonState != LOW) state = State::IDLE;  // go back to IDLE - alternative if you don't want to restart in case button is still pressed.
          }
          break;
      }
    }
};

//create  instances (each with one button and one led/LED)
Dimmer dimmer[] {
  {A0, 3},  // buttonPin, ledPin
  {A1, 5},
  {A2, 6},
};

void setup() {
  Serial.begin(115200);
  for (auto &i : dimmer) i.begin();  // call begin for all instances
}

void loop() {
  for (auto &i : dimmer) i.update(); // call update() for all instances
}
The member function void begin(byte pin)
The member function begin() takes care of the right pinMode settings. Call the begin function in your setup.
The member function void debug()
This is just a function to display internal variables. It can be used to follow what the finite state machine is doing during runtime.
The member function void update(uint32_t currentMillis = millis())
update() is the run method. It will handle the LED according to the current state and react on button actions.
You might ask, why the variable currentMillis is defined as parameter with
the default value of millis(). Obvious you will need the current millis in the
function to do checks against previousMillis. You could use millis() in the
function also. But it might be calles several times in the function.
The reason why I prefer to handover the currentMillis as parameter is that this
enables me to do one single call of millis() in loop and handover the same value
for millis() for all instances per iteration:
void loop() {
  uint32_t currentMillis = millis();              // one call to millis() for all objects
  for (auto &i : dimmer) i.update(currentMillis); // call update() for all instances
}
Create several Dimmer Objects
Writing a class makes it very easy to reuse code for each of the button/LED combination. You just need to create an array of objects and hand over the needed pins:
//create  instances (each with one button and one led/LED)
Dimmer dimmer[] {
  {A0, 3},  // buttonPin, ledPin
  {A1, 5},
  {A2, 6},
};
The setup()
usually you would call the pinMode() for the used pins in your setup(). As we have written a .begin() function we just call .begin() for each object. We don't need a hardcoded count of the objects (in our example 3), nor we need to let the compiler calculate that during runtime .
Similar to other programming languages which offer a foreach loop, we will use an auto range based for loop in C++
for (auto &i : dimmer) i.begin(); // call begin for all instances
The loop()
In loop() we need to call the .update() function for each object. Therefore we use again a auto range based for loop
for (auto &i : dimmer) i.update(); // call update() for all instances
Summary
You see, writing a non blocking sketch and process a sequence of activities in a finite state machine is quite easy using millis(). There is no need to block the code with a delay().