A Webserver for the ESP8266 and ESP32
ESP8266 and ESP32 are great microcontrollers with WIFI. Using a webserver to control pins or display sensor data on a webpage comes in mind. On this page I would like to show a easy way how to get a nice working webserver on an ESP.
The right webserver examples to start with in the Arduino IDE are:
- on the ESP32 the IDE example Webserver / HelloServer
- on the ESP8266 the IDE example ESP8266Webserver / HelloServer
After your first tries you might come up with the question how to switch pins with your browser. On this page I want to explain
- how you can set up your ESP webserver,
- how to control pins,
- give the page a nicer look and
- how to updates values on the ESP webpage.
A Generic Demo Sketch
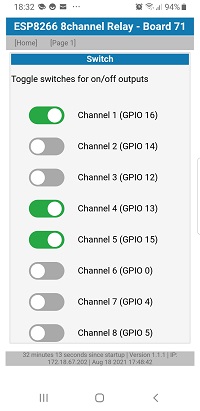
I have put together a generic demo sketch. It is a simple ESP8266/ESP32 webserver to switch the relays on or off and read input pins. It also offeres some sliders for PWM outputs. You can download this sketch at the end of the page.

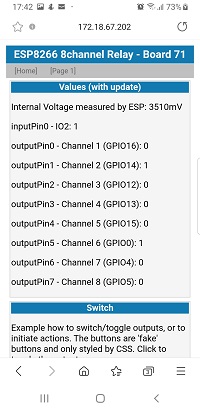
Page 1.htm is just for debugging. It shows the states of all pins and offers simple toggle buttons to switch the relays.

How to get started with the ESP webserver
At the end of this page you will find a download link to the generic ESP webserver. The sketch has several tabs.
In the main tab you will find around row 65 the line
#define USE_BOARD 1 // the actual board to compile
set the number of configuration you want to compile.
In rows 82/83 you can define your wifi credentials.
#define STASSID "your-ssid"    // ... modify these line to your SSID
#define STAPSK "your-password" // ... and set your WIFI password
If you compile the sketch and upload it to your ESP, it should connect to your WiFi. The IP address will be written to the serial monitor and you should be able to see a working webserver at the given IP address.
A Webserver for Relay / PWM Boards based on a ESP
I have several different ESP8266 and ESP32 boards and I wanted one generic test sketch. So I came up with the idea to share this sketch with others. The sketch should work for all ESP8266 and ESP32 based boards as long as you configure the pins correctly.
Configure the Generic ESP Webserver Sketch
In general the generic sketch uses arrays of pin definitions. This makes maintenance for different boards very easy.
Before the first compile, got to the main tab and define which board variant you are using. Start with board 1:
#define USE_BOARD 1 // the ESP8266 8 channel board
Don't forget to either set your wifi credentials or include your settings in the main tab.
Hardware Configuration
There are several configuration prepared. They are called "config" followed by a number.
- config1.h
- config65.h
- config71.h
- config72.h
- config76.h
- config79.h
The content of the configuration files is very similar. I'll pick out config1.h as example:
Each file contains an include guard, an ID for the board and a clear text name which will be printed on the Serial.Monitor and in the header of the webserver.
#pragma once
#if USE_BOARD == 1 // this is an ID for the configuration
#define TXT_BOARDNAME "Generic ESP Webserver" // the name of the board on webgui and Serial
HardwareSerial &Terminal = Serial;
Then you must declare which pins should be used.
The array inputPins[] holds all GPIOs which should be read. The second parameter is a name to be used for the prompter on the web interface:
// assign pins to arrays:
Pin inputPin[] {
// the pin,  a name for the website
  {0, "IO00"}, // the NodeMCU has a flash button
  {13, "IO13"},
  {14, "IO14"},
  {15, "IO39"}
};
Then assign pins to digital outputs (e.g. for relays). The prompter will be printed in the web GUI and you must define if the relay is HIGH active or LOW active
OutputPin outputPin[] {
// pin, a name, LOW active or HIGH active
  {2, "IO02", HIGH}, // on some ESP8266 there is a blue LED on the ESP
  {4, "IO04", LOW},
  {5, "IO05", HIGH}
};
If you have hardware to drive PWM pins (e.g. for LED stripes) you define pins and a name for the webgui. You can initialize a start value. The PWM output is a 10 bit value (0..1023).
PWMPin pwmPin[] {
//pin a name a PWM value
  {16, "IO16", 1023}, // on a NodeMCU there is a LED (invers)
  {13, "IO13", 511},
  {12, "IO12", 0}
};
Finally, you can use a LED as indicator for wifi activity. If you don't have a spare LED available or you don't need a WIFI indicator, set the variable to 255:
const byte wifiActivityPin = 2;
#endif
This concludes the basic configuration for a board.
If you only have one pin for the array just define this one pin. If you don't want to use any pin delete the array declaration and replace it with the respective precompiler define:
#define NO_PWMPIN     // no pins for PWM used
#define NO_INPUTPIN   // no pins used as input
#define NO_OUTPUTPIN  // no pins used as output
#define NO_SHIFTPIN   // no pins used on shift registers
See the config65.h as example for a board without PWM pins or config72.h for a board with shift registers.
Your own Board Configuration
I recommend to give each board in your fleet an individual ID. Create a separate tab ending with .h
- copy and paste config1.h to an ID of your choice (e.g. 42) and create a new tab
- open tab config.h and add the ID so the compiler can include your board id to the definition
#elif USE_BOARD == 42
#include "config42.h"
- finally change in the maintab the USE_BOARD to your ID
#define USE_BOARD 42 // the actual board to compile:
press compile and upload the sketch to your board.
The tab server : The webserver on the ESP8266 / ESP32
The server part of the sketch is quite huge. So let's explain what's in there:
0.htm is the main page of the server. It contains all the HTML needed to display the pins, the sliders, the buttons.
1.htm is a simple page and displays several variables. You can use this during your debugging.
Both html pages include the stylesheet, and the JavaScript needed for the button handling and the update of the webpage.
j.js is a file containing JavaScript. Main function is to fetch data periodically from the server and to update the fields and buttons on the webpage. Furthermore it contains some functions to react on button presses and slider movements.
json is plain data sent from the server to your browser containing actual values in JSON format. This json files will be parsed by the JavaScript.
cmd is a resource on the sever to retrieve data from your browser. Every time you press a button or move a slider, the new data will be sent to cmd. For example the ESP can switch on or off the pin you have triggered in the browser.
f.css is a CSS (a stylesheet) to make the layout of the webpage nicer. The sliders and the rocket switches are pure HTML elements and only styled by CSS. The main colors are using CSS variables, so you only have to change the colors in the root selector and every element using the variable should be changed accordingly.
Then there are some helper functions:
handleNotFound() will give a typical "404 not found" page if the user requests a non existing page.
handle204() will respond with HTTP code 204 "no content". This is used to indicate the browser that the request was processed but no further content will be responded. This is a fast way to respond to favicon.ico requests.
addTop() and addBottom() are sub functions adding the top and the bottom of the HTML to a page to get a consistent header/navigation/footer style through all pages.
The Tab "config.h"
The tab "config.h" includes the configuration file which was defined in the maintab.
The Tab "general.h"
the tab general.h contains some declarations of variable types used in the sketch.
The Tab "hardware.h"
The tab hardware.h contains some hardware related functions. For example the handling of shift registers.
One Webserver for ESP8266 and ESP32
This generic ESP webserver sketch is compatible for ESP8266 and the ESP32. Hence there are several precompiler defines to differentiate the boards based on your upload settings.
Additonal Note: OTA
The sketch adds OTA (over the air) update capability. This means you can update your ESP8266 / ESP32 via WIFI without a serial connection.
Summary
The ESP8266 / ESP32 webserver can be used to switch pins (LEDs, Relays) with your webbrowser. A CSS stylesheet can be used to design the layout of your page. Updates of values can be done using the Fetch API and JavaScript.
