Arduino Webclient with Store and Forward (SAF) Backup to SD Card

 If
you need to forward data to an external server with a webclient you can have
situations that the server is not responding. In this case you might want to
save the data as backup on a SD card an retry the transmission at a later time.
On this page I would like to show my version of such a Store-and-Forward
(SAF) process.
If
you need to forward data to an external server with a webclient you can have
situations that the server is not responding. In this case you might want to
save the data as backup on a SD card an retry the transmission at a later time.
On this page I would like to show my version of such a Store-and-Forward
(SAF) process.
First I will explain the concept, afterwards the most important functions in the tabs. The Arduino sketch can be downloaded at the end of the page.
The Concept of Store and Forward
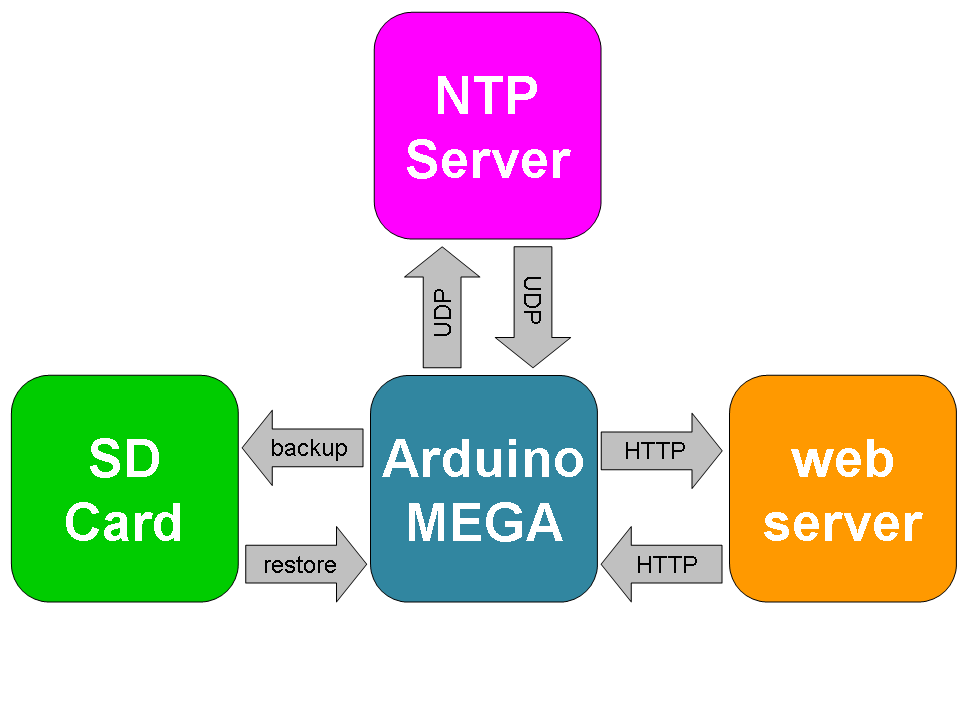
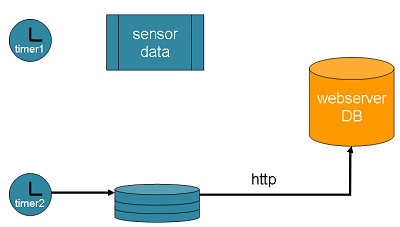
Let's assume an Arduino with a webclient should send data periodically to an external webserver. If the webserver is not responding the Arduino should backup the data to a SD Card. The Arduino will transmit the data later, when the webserver is available again. As we want to store data for later usage we need a timestamp. In this example I'm fetching time from a NTP server. Timekeeping could also be done with an I2C RTC DS3231 module. In other words - we need a valid timestamp if the transmission fails.
Bascially we run two main tasks:
- one is a timer to get sensor data and call the webclient.
- the second timer will check if we have backup data to be transmitted.
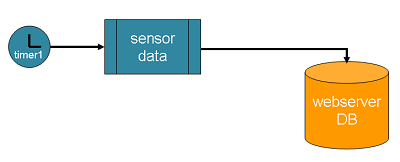
The Webclient Task
By default one timer will send data to a webserver:
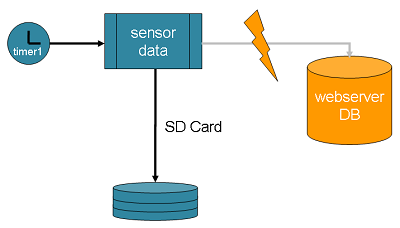
If the webserver is not available we store the data on a SD card. We will call this a SAF file (store and forward file):

This will happen each time we want to transmit data. If the webserver is not available, the data will be stored as separate file to the SD Card. After several unsuncessful measurements we have several files on the SD card.
I wanted to have all data in the database in the correct order. Therefore the client timer checks if any SAF files are currently stored on the SD Card before the timer fires the new transmission to the server. If SAF files are available the current data will be appended as new SAF file to the SD Card. The transmission to the webserver is (implicit) handled by the SAF task. Therefore newer data can't be sent as long as older data is stored on the SD card. See following program flow:
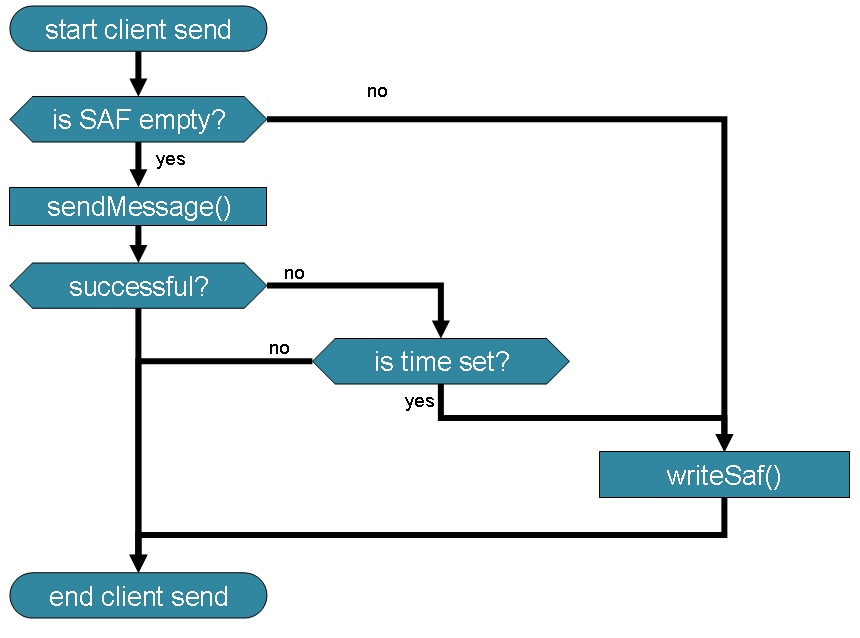
There is also a check if we have an actual time. Because it makes no sense to backup data for later usage if we don't know the current time. All timestamps are used in UTC.
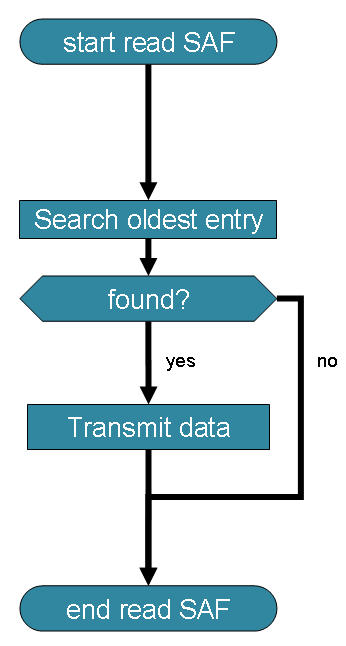
The Store and Forward Task
Another task (timer2) will observe the store and forward data storage. If a SAF file is available on the SD card, the oldest (!) file will be transmitted. If the transmission was successful, the SAF file will be deleted from the SD card.
Currently the Store and Forward task only forwards the oldest file. If there are several SAF files on the SD, the next file will be transmitted next second. This is mainly done to not block the loop to long.
In the current implementation I'm storing the full payload of the data to be transmitted. In case of the webclient this includes all clear text parameter names. When the webclient call fails I just take the payload from the webclient and store it to a new SAF file. If I process the SAF file I read the content of the SAF file and handover it to the webclient without any further processing. This makes the Store and Forward processing quite simple. Drawback is, that the stored SAF file needs more storage because of the parameter names. If you rund out of memory on your SD card, just use a larger one.
To know the age of a SAF files these files are named with the UTC timestamp in HEX. As a 32bit timestamp can be written with 8 HEX characters and the file system only supports 8.3 - this fits perfect. The file extension for a SAF file is SAF.
The Sketch Example
Please download the sketch at the end of the page. The sketch is organized in several tabs to make reusing easier.
The Main Tab
There is nothing special in the main tab. We need some includes and some configuration. If not already done, install the StreamLib library and the TimeLib library.
The setup() starts the Ethernet shield, initializes the SD Card and starts the UDP for NTP.
The loop() is short - it only calls some functions - the comments should describe what the sketch is doing:
void loop()
{
  checkForClient();  // listen for incoming clients - the "webserver"
  //timerSD();       // * checks if it is time to write data to SD Card
  timerNTP(false);   // checks if it is time to sync with NTP
  timerClient();     // checks if it is time to send data via client
  //timerSafStore(); // * checks if it is time to create a SAF file
  timerSafForward(); // check SAF if something ist to be forwarded
}
timerSD() and timerSafStore() are not used, hence commented. I will describe later why.
The Configuration File config.h
The configuration file starts with some pin definitions.
Define your webserver and the entrypoint/script (=target of your data transmission).
The ethernet shield needs some definitions. Adopt the IP address to your home network.
The arrays for the digital pins and analog pins are just for this example. You can modify them to your need.
Finally set a fitting NTP server pool for your region.
Post Data with the Client
The client uses 3 functions:
- void timerClient(): this timer checks if it is time to call the clientTrigger.
- void clientTrigger(): this function calls createPayload() and sendMessage(). If the communication with the server fails, the payload gets stored onto the SD Card.
- void createPayload(): this helper functions fills a buffer with the payload. That payload can be either sent with the webclient or stored to the SD Card. This means it is also used by the SAF task.
- byte sendMessage(): This is the client function to post a message buffer to another webserver
The Arduino Ethernet Shield
The Ethernet shield uses pin 10 as chip select. If you are using something different, don't forget to adopt the config.h. There are only two functions for the Ethernet shield
- void ethernetBegin() - which needs to be called in setup. It contains a blocking delay to give the Wiznet chip enough time to wake up.
- void ethernetHardwareInfo() - is optional, it prints some diagnostic data to serial
Retrieving time with NTP (SNTP)
SNTP is used to get time. As mentioned already you could also use a RTC.
- void timerNTP() checks, if a new time syncronization should be started and calls sendNTPpacket. Afterwards it checks for a short periode, if a NTP server has responded with a new NTP time. The code is written as finite state machine and NON BLOCKING.
- void ntpSendPacket(): sends the UDP NTP packet
- int ntpCheckIncomingPacket() checks if we have received a UDP NTP packet and does the internal time update.
The other functions are optional and currently not used. For further explanation of the code, see my page about Arduino and NTP.
Note: I prefer to let the controller run in UTC because this makes time management easier and will work also during the changes of daylight saving parameters. If you need your local time on user frontends - just do the calculation for that user frontend.
Store and Forward - SAF
This sketch is used for the store and forward processing and has several functions.
- void timerSafForward() is a timer to check the store and forward storage and forward data to external server if available
- void timerSafStore() is a timer to do measurements and create a Store-And-Forward file. This is used only for testing purposes. As alternative you could withdraw the client timer, let the timerSafStore create SAF files, and transmit the files with timerSafForward
- void safTriggerStore() fetches data and triggers the safStore
- void safStore() generates a new SAF file on the SD card
- int safTriggerForward() try to forward the oldest SAF file to the external server
- int safForward() try to forward a specific file to the external server
- uint32_t safCountFile() return number of SAF files on SD and the filename of oldest file
- void listDirectory() a helper function for safCountFile, lists directory and updates filecounter and filename
The SD Card on the Arduino Ethernet Shield
The Arduino Ethernet/SD Shield uses pin 4 as chip select for the SD Card. If you are using a different SD shield, adopt the configuration. I'm using a Sandisk 2GB Micro SD Card - therefore it is formatted in FAT16 as recommended by the writer of the SD library and the results are reliable.
The SD tab only contains one function:
- sdSetup(): initialize SD card reader in setup
Control the Program via Serial
currently there are 3 commands available to be able to control the program flow during runtimge. You can generate an entry to your webserver (g), you can trigger to store a SAF file (s) and you can trigger the forwarding process (f). In a production system you will not need this function.
It's not Working at all!?!
First of all, the demo works fine on an Arduino Mega and even compiles on an UNO. I would not publish the sketch if it wasn't working. The sketch compiles with Arduino IDE 1.8.19 with two warnings from the Ethernet Library. To fix this warning you have to patch the Ethernet library (or just accept the warnings).
Sketch uses 27146 bytes (10%) of program storage space. Maximum is 253952 bytes.
Global variables use 1290 bytes (15%) of dynamic memory, leaving 6902 bytes for local variables. Maximum is 8192 bytes.
If you have any questions, I suggest you use the Arduino.cc forum and ask. Formulate your problem, link to this page and describe where your are struggling.
Summary
This sketch demonstrates a "Store and Forward" backup for data transmission using a SD card as temporary data storage. NTP can be used to gather timestamps for the backup data.