The A02YYUW Ultrasonic Sensor

A02YYUW is a waterproof ultrasonic sensor module with 4.5m effective ranging distance. It can be used with 3.3 - 5V microcontrollers like Arduino, ESP8266, Raspberry.
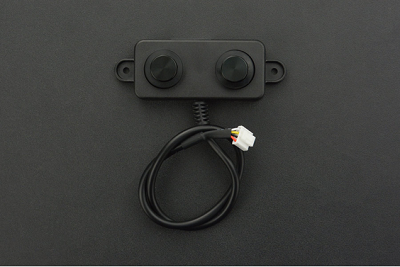
The sensor sends data permanently via Serial interface (with TTL voltage). One advantage in comparison with the cheaper ultrasonic sensor is, that the A02YYUW will work autonomously and non blocking. You just have to read the Serial data.
This page not only shows how to read this kind of ultrasonic sensor, but how to read fix size messages in general.
A02YYUW Ultransonic Protocol P1 Basics
The A02YYUW protocol is an unencrypted protocol. Each line begins with a start flag 0xFF, followed by two bytes of playload and one byte as checksum. In total 4 bytes are transmitted in each message. There is no dedicated end marker.
This is an example of a value of message for 1697mm:
FF 07 A1 A7
Member Functions of the A02YYUW class

I decided to implement the A02YYUW sensor as class with following public member functions:
.getDistance() returns the last valid result of distance measurement. The unit is millimeter and restricted to a maximum of 4500mm.
.update() call this method in loop(). It will read available data on the Serial interface and update the distance value accordingly.
Additionally you can define a callback function in your sketch. This callback
function will be called, when the transmission of new Data was completed.
.setOnNewData(callbackOnNewData) will inform the class to call "callbackOnNewData()
whenever the data was updated completely. Obviously you must define the function
callbackOnNewData() in your usersketch. The A02YYUW sends very often new data
(100ms ?), so be prepared that a callback function will be called multiple times
per second.
Parsing of Data - Some words to the Strategy
Like in most of my Serial interface examples I'm following the tutorial "Serial Input Basics" as it gives a nice start for a reliable communication.
As explained each message starts with 0xFF in byte[0]. Unfortunately you can't use 0xFF as the only start indicator, because 0xFF could also be used in the payload or the checksum. Therefore we will need some special measures:
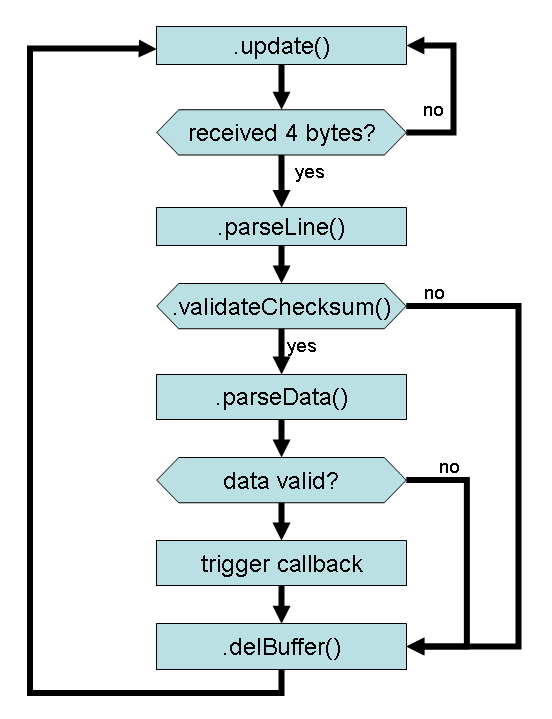
The update function reads incoming bytes. if the incoming byte is 0xFF the byte will be stored and the index (ndx) will be incremented . Consecutive data will be added to the recveive buffer (receiveChars).
If we have collected 4 bytes parseLine() will be called.
parseLine() calls validateChecksum to verify if the received checksum is correct.
If the checksum is correct the data will be parsed.
If the data is correct (only measurements up to 4500mm are accepted) and a callback function was defined the callback will be called.
In any case the current buffer will be deleted and the index (ndx) resetted to 0.
The microcontroll is ready to receive a new message from the ultrasonic sensor.
The Example Sketch
/*
   A02YYUW Ultasonic Sensor
   https://wiki.dfrobot.com/_A02YYUW_Waterproof_Ultrasonic_Sensor_SKU_SEN0311

   Serial Receive Example for a fix length telegram with start flag

   Valid telegram
   FF 07 A1 A7
   FF            start flag / start marker
      07 A1      data HI nibble, data LO nibble, result is distance in mm
            A7   check sum

   based on a discussion in: https://forum.arduino.cc/t/sen0311-uber-serielle-softwareschnittstelle-einlesen/951260

   by noiasca
   2022-01-26
*/

class A02YYUW {
  protected:
    static const byte numChars = 4;    // receiver buffer size
    char receivedChars[numChars];      // an array to store the received data
    byte ndx = 0;                      // length of received message
    boolean newData = false;           // flag to indicate when new data is complete
    Stream &stream;                    // a reference to the serial interface
    void (*cbOnNewData)();             // gets called after we received a full message
    // payload data
    int distance = 0;                  // distance in mm

    void delBuffer()
    {
      memcpy(receivedChars, "", sizeof(receivedChars));
      ndx = 0;
    }

    void parseData()                   // parse data and if according to specification store to internal variable
    {
      int result = (receivedChars[1] << 8) + receivedChars[2];
      if (result <= 4500)
        distance = result;
    }

    bool validateChecksum()            // validate if checksum of telegram is correct
    {
      int sum = (receivedChars[0] + receivedChars[1] + receivedChars[2]) & 0xFF;
      if (sum == (receivedChars[3] & 0xFF))
        return true;
      else
      {
        //Serial.println(F("E49: invalid checksum"));
        return false;
      }
    }

    void parseLine()                   // process a telegram
    {
      //Serial.print(F("I56: This just in ... ")); Serial.println(receivedChars);         // output all
      if (validateChecksum())
      {
        parseData();
        if (cbOnNewData) cbOnNewData();
      }
    }

  public:
    A02YYUW (Stream &stream) : stream(stream)
    {
      delBuffer();
    }

    uint16_t getDistance()             // return the last valid result
    {
      return distance;
    }

    void setOnNewData(void (*cbOnNewData)())     // set a callback function. Gets called when new data was received
    {
      (*this).cbOnNewData = cbOnNewData;
    }

    void update()                                // run this member function in loop()
    { // start flag, fix length
      constexpr char startMarker = 0xFF;
      if (stream.available() > 0) {
        char rc = stream.read();
        if (ndx == 0)
        {
          if (rc == startMarker)       // we only accept the startMarker on ndx=0
          {
            delBuffer();
            receivedChars[ndx] = rc;
            ndx++;
          }
        }
        else                           // for all other ndx positions we accept any value (including the startMarker
        {
          receivedChars[ndx] = rc;
          ndx++;
          if (ndx >= numChars) {
            ndx = 0;
            parseLine();
          }
        }
      }
    }
};

#include
SoftwareSerial mySerial(2, 3);          // RX, TX

// create the sensor object and hand over the Serial interface to use:
A02YYUW ultrasonic(mySerial);           // on an UNO you will need SoftSerial to connect to the ultrasonic sensor
//A02YYUW ultrasonic(Serial);           // use Hardware Serial (for example for testing with the PC)

void output()                           // simple output of data
{
  Serial.print(ultrasonic.getDistance());
  Serial.println("mm");
}

void timerOutput()                     // a timer to output data to serial
{
  static uint32_t previousMillis = 0;  // time management
  const uint16_t interval = 3000;      // interval to display data
  if (millis() - previousMillis >= interval)
  {
    previousMillis = millis();
    output();
  }
}

void setup() {
  Serial.begin(57600);
  mySerial.begin(9600);
  //ultrasonic.setOnNewData(output);  // register a callback function which gets called when a new telegram was received
}

void loop() {
  ultrasonic.update();                // you must call the .update() method in your loop()
  timerOutput();
}
How to Test
In the code you will see some (deactivated) debug messages. You can activate them if you encounter a problem with the communication with your sensor.
Disclaimer
This example sketch has prototype status. Don't expect a perfect example - but in my opinion it should work very reliable (at least as good as the example code provided by DFRobot).