Data Transmission between Microcontrollers (ESP8266, ESP32, Arduino)
Let's assume following usecase with several microcontrollers: Three ESP are used as "weather station" and each collects temperature, humidity and pressure. An additional ESP should collect all data and present the data of each weather station. All four ESP are connected on the same WiFi and the data should be transmitted via IP based transmission. This page will give a first overview about the IP based data transmission and should enable you to decide about the right methods for your application. The page doesn't contain complete sketches but at the end of the page you will find links to dedicated examples.

On this page I will cover following topics:
- Overview on UDP, TCP, HTTP
- Short explanation of UDP, TCP, HTTP with hints when to chose which data transfer method
- How to handle data (payload encoding/decoding)
On end of the page you will find the download of several for the ESP8266/ESP32. There are also some examples for the Arduino UNO/NANO/MEGA on this site.
Client - Server
First lets explain the roles of our microcontrollers in the context of data transmission:
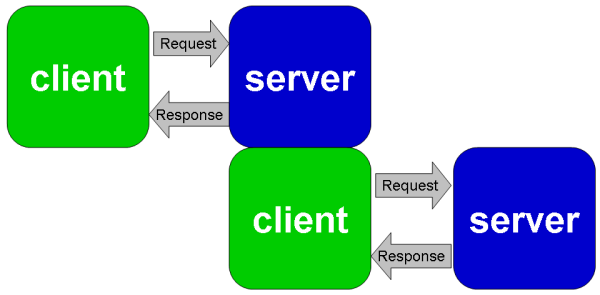
A client initiates the communication
A server waits for a communication initiated by a client. It provides a resource which can be used by other.

The roles of "client" and "server" does not define which side transmits payload data. Data transmission can be client -> server, server -> client and even bidirectional.
A device can have both roles also: For example a unit can have the client role to fetch data from others and it can provide a webserver so you can see all data on a webpage.

Bascis about UDP, TCP and HTTP
UDP: User Datagram Protocol
UDP (User Datagram Protocol) is a minimal, connectionless network protocol. It is a one way communication without handshaking and therefore classified as "unreliable". "Unreliable" isn't a bad thing at all, it mainly means, that the client can't be sure if the data was received by the server. If there is no problem with "missing data" on the server side UDP is suitable where error checking is not necessary or the transmission is time sensitive. UDP can be used in 3 variants.
UDP unicast
UDP unicast is a 1 to 1 communication. One client sends data to one server. The server doesn't respond to the client. It is a "fire and forget". Either the server has received the request or not.

UDP multicast
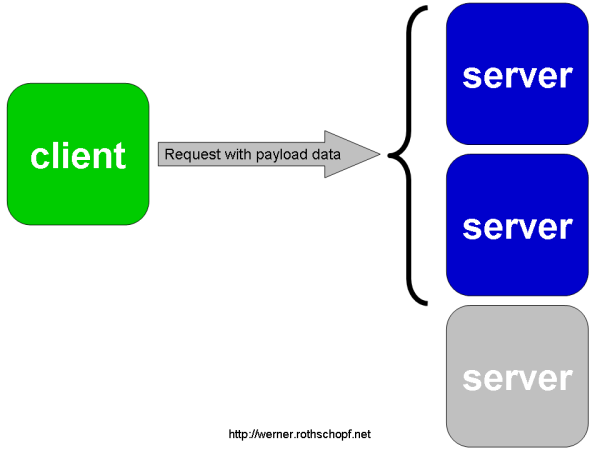
UDP multicast is a one to many transmission (within the own network). For example you can have several servers in your network but only some of them should receive the message with the payload data:

UDP broadcast
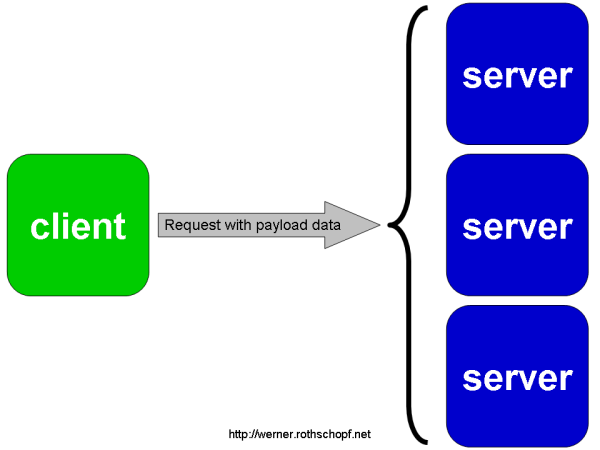
UDP broadcast is a one to all transmission. The data is transmitted into the network. Any UDP server listening to the broadcast can receive the message with the payload data. There are two variants: either
- Limited Broadcast (only your own network, not routed) to 255.255.255.255 or
- Directed broadcast to x.x.x.255

Using UDP transmission for the Usecase (3 weather stations, one central unit)
Each weather station could send a UDP package to the server as unicast or just broadcast the message to the network. The server can pick up each UDP message and assign the values to local variables. You can use this procedure also with deep sleep: A weather station wakes up from deepsleep, does the measurements, transmits the data and goes into deepsleep again.
You can also implement a variant like it is done with SNTP: The main unit ask each station for a new value via UDP. Each weather station opens a UDP connection to the main unit and transmits its data.
TCP - Transmission Control Protocol
TCP is a reliable bidirectional data transfer.

The server must be listening (passive open) for connection requests from clients before a connection is established. The client opens the communication (request) and the server answers with a response. After the bidirectional communication the communication can stay open or either of the two parties can close the communication.
Client sends data to Server
The client can send payload data to the server - the server just acknowledges the transmission:

Using TCP transmission for the Usecase (3 weather stations, one central unit)
Each weather station could send a TCP package to the server. The client could add a client ID to the payload, so the server knows, from which client the data was received. Client identification can also be done by the IP address, but in network with DNS IP addresses might change during lifetime.
Client requests Data from Server
The client can request information from the server and the server responds with payload data:

Using TCP transmission for the Usecase (3 weather stations, one central unit)
In our usescase this would mean the main unit is a client. The main unit request data from a weather station and the weather station responds with the current data. The main unit would need to repeat this step for all weather stations in the network.
Client sends Data, Server sends Data
You can combine both ways and let the client transmit data in the request and the server responds with server data to the client:

Using TCP transmission for the Usecase (3 weather stations, one central unit):
A weather station could send its current data to the main unit and the main unit could respond with a command to activate an output (e.g. a fan) on the client.
HTTP

HTTP is an application layer protocol on top of TCP. It inherits all attributes from TCP (e.g. bidirectional). It is commonly used to transmit HTML pages but you can also use it to transfer plain payload data between a client and a server. Again you can use all three options of transmission directions (client to server, server to client and vice versa)
There are several good reasons to use HTTP for data transmission:
- If you have already a webserver running, use this webserver also to receive data from other clients. Most of the infrastructure is already available and the extension to receive data from a webserver is very easy. Furthermore a working webserver makes testing during development phase very easy.
- On ESP8266/ESP32 the WebServer has a very easy API to extract the transmitted data from the client on the server side. If you need to transmit several values to the server, the API for the ESP webserver comes with very easy member functions .hasArg() and .arg().
if (server.hasArg("runtime")) {
  othersRuntime = server.arg("runtime").toInt();
}
HTTP adds a bit of overhead compared to a plain TCP connection due to the HTTP Header, but that should not cause an issue on larger microcontrollers like the ESP8266 or ESP32.
Combination of UDP and TCP
When you design the communication between your microcontrollers your are not limited to either UDP or TCP. You can combine both protocols: For example a main unit could broadcast a UDP message to the network "send me your data" and afterwards each weather station could send its data using TCP.
Sum up UDP, TCP, HTTP
There are lot more IP based data transfer protocols. For sure you have already heard of FTP, SMTP or NTP just to name a few. However, for a simple unit to unit transmission of sensor data the described protocols should give you a first summary, what to chose in your application.
Payload formating
Finally I want to cover some aspects of payload formating. Let's describe possibilities how to format sensor data so it can be transferred with the above protocols.
- Single Value
- Linewise transmission
- Tag Value
- JSON
- Binary Data
Single Value
If you want to transmit a single value, just process the incoming data on the data receiver side. Most of the examples in the IDE and on the internet cover this topic. Often this value is a simple "hello world", "hello server", "hello client" message. One unit transmits a payload line, the other reads the incoming line and processes the line. For example, if the client sends the current runtime as
2181
the server could parse this line into a numeric variable:
othersRuntime = atol(readedInputData);
There are several functions like atoi(), atol(), atoll(), dostrf() for c-strings or the member function .toInt() for Arduino Strings (with capital S) to convert the incoming data to a numeric variable.
Several Values
An easy way to transmit several data elements is to split the data with a character or a linefeed:
2181
38.2
93.2
1024.4
The linefeed makes the reading with readStringUntil(terminator) very easy. Drawback of such a "encodign" is that the reordering, deletion and adding new values will need changes on both sides - the client and the server side - at the same time. Leaving one receiver behind might break application code on receiving.
Tag Value
You can add a tag (a name) to each value. The payload now gets better readable. Reusing the previous values, the tags might be named like following:
runtime=2181
temperature=38.2
humidity=93.2
pressure=1024.4
The payload is now human readable and you gain an improved error handling when you change the order of values, delete a value or add a new value in your payload structure. You can parse the incoming data linewise and copy the received data in your variables.
Remark: If you decide to transmit your data via HTTP to an ESP, the ESP can handle these values very easily. In HTTP the data payload will be transmitted in a form like
runtime=2181&temperature=38.2&humidity=93.2&pressure=1024.4
The JSON data format
If you want to transmit several data I propose to encode the data as JSON.
This is an example of a simple JSON structure with 4 fields:
{
  "runtime":2181,
  "temperature":38.2,
  "humidity":93.2,
  "pressure":1024.4
}
There are several advantages using JSON:
- When your project is growing you can modify the structure of transmitted data.
- When you add new data fields or delete fields it is very likely that clients will still be able to parse the old data. New fields within the data structure should not interfere the client.
- JSON is human readable - makes debugging easier.
- JSON adds less overhead to the payload than XML.
Generating ("encoding") a simple JSON could be done manually. Decoding of a JSON is complicated, but there is the ArduinoJson library available. As we will need the ArduinoJson library anyway in these projects, I propose to use it also to generate the the JSON. ArduinoJson is quite substantial, but also offers an online code generator called "ArduinoJson Assistant" which will help you to generate the right code.
You will find a full TCP/JSON example (client and server) in the links at the end of the page.
Transmit Binary Data
You can transmit data also in binary. For example you could define a structure for your payload data
struct Payload {
  int runtime;              // 2 or 4 bytes?
  float temperature;        // 4 bytes?
  float humidity;           // 4 bytes?
  float pressure;           // 4 bytes?
}
Now you can copy this data to your output buffer and transmit the data in binary. Depending on the microcontroller this data structure could be either 14 or 16 bytes large. You must keep in mind what microcontrollers you are using and which one sends which kind of data. You can imagine that splitting will not work correctly if client and server have different variable sizes. Experienced users will tell me, there are ways around that, but it is not the way I will suggest and I will not provide an example for it. I'm sure you will find examples in the internet. If you have found an example that contains a data structure with "union" - google also for "c++ type punning union" and learn if you should really use it in your application.
ESP NOW (Digression)
ESP-NOW is a wireless communication protocol for Espressif microcontrollers (ESP8266, ESP32,...) without the need of a router. It is fast and supports a mesh infrastructure. Each ESP NOW enabled ESP can act as client (send data) and server (receive data). Addressing is done based on the MAC address. ESP-NOW goes beyond this introduction and might be added at a later stage.
Summary
You now know first basics about IP based data transmission between microcontrollers. If you still need help to decide the right way for you application, I suggest you use an internet forum of your choice, describe your application and ask for help. If want to see example sketches, check this site and follow the links in the links section.
