HTTP Client Server Communication with ESP8266

Extended example to demonstrate a Client Server Communication based on HTTP between two ESP8266.
If you came here you might have already read about UDP, TCP or HTTP. There are valid usecases for each variant.
- UDP: for fast one way communication, "fire and forget", broadcast and multicast available
- TCP: reliable bidirectional communication
- HTTP: on top of TCP
On this page I show the Client Server Communication based on HTTP.
Why - or better when - do I use HTTP for communication between a client and a server?
It should be clear that HTTP is adding
overhead on top of TCP. However if you check available APIs in the internet you
will see that lot of the communication is build on HTTP(s). In the context of
ESP I would use HTTP if there is already a HTTP/Webserver running on the server
side. A (web)client can transmit data to the server as parameters. These
parameters can be easily parsed on the server side using server.arg(i)
and server.Name(i). This
easy parsing of client data is my main reason to use HTTP. It takes some more
efforts to process data from the server response on the client side and hence
this site will demo that also.
The Usecase: ESP Extended Server and ESP extended Client
The webclient will send its board ID, the internal meassured VCC, the state of two outputs (which are used on the NodeMCU for LEDs) the button state (= flash button of the NodeMCU) and a float value.
The webserver will store the received client data to separate variables and respond with similar data. Furthermore, the webserver will show the received data on a separate page.
The webclient will store the received data to variables.
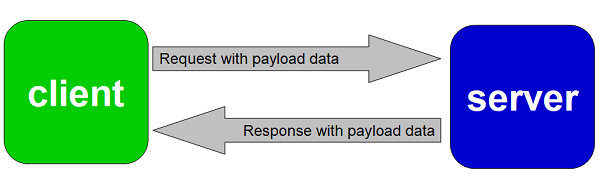
Step 1: Send data from webclient to webserver
Lot of example can be found which append data to the URI and transmit the
data with the GET method. A better method is to put the parameters in the
payload of the request and POST the data. The example will post data like board=2&vcc=2984&output1=0&output2=0&button1=1&float=1234.57.
See the tab client for the code.
Step 2: Process received data from weblient on the webserver
As already mentioned above, the parsing of parameters on the server side is quite easy. See the
top part of the function void handleData():
It checks each parameter and retrieves the value into the designated variable.
Step 3: Respond with data from the webserver to the webclient
In a real world application one would use XML or JSON to give the payload a
data structure. The library ArduinoJson could be used on both sides for easier
handling of JSON. In this example I just use the same format of key/value
pairs like for parameters. See the second half of the function void
handleData() it looks very similar to the client function.
Step 4: Process received data from webserver on the webclient
On client side the parsing of a key/value pairs needs some effort. Here I'm
using strtok to split the received payload into tokens and fill the variables. As already
mentioned above, the parsing of parameter is quite easy. See the bottom half of
the function void sendPost(). When the request was sucessfull
if (httpCode == HTTP_CODE_OK || httpCode == HTTP_CODE_MOVED_PERMANENTLY)
the tokenization of the payload will be processed.
It checks each parameter and retrieves
the value in the designated variable.
Webserver Basics
The right webserver examples to start with in the Arduino IDE are:
- on the ESP8266 the IDE Example ESP8266Webserver / HelloServer
- on the ESP32 the IDE Example Webserver / HelloServer
The server sketch is based on other examples on my page. For this specific usecase see the extension to process a call of d.php.
How to get started with the ESP extended server and ESP extended client
At the end of this page you will find download links to the ESP extended webserver and a ESP extended webclient. The sketches have several tabs.
In the main tab you will find the line
#define USE_BOARD 1 // the actual board to compile
This enables you to hold several configurations for several boards in one sketch and to have a simple switch to decide which board you want to compile.
Furthermore you have to define your wifi credentials. Either use an external file with your credentials or set them in the sketch:
#define STASSID "your-ssid"    // ... modify these line to your SSID
#define STAPSK "your-password" // ... and set your WIFI password
If you compile the sketch and upload it to your ESP, it should connect to your wifi. The IP address will be written to the serial monitor.
You should be able to see a working webserver at the given server IP address.
In the ESP extended client you have to set up the right server IP address to make the example working:
const char* sendHttpTo = "http://172.18.67.124/data";
The tab server : The webserver on the ESP8266 / ESP32
The server part of the sketch is quite huge. It's mainly a knock off from my ESP generic webserver. So let's explain what's in there:
0.htm is the main page of the server. It contains all the HTML needed to display the pins, text or buttons.
1.htm, x.htm are a simple demo page and displays several variables or text.
Some html pages include the stylesheet, and the JavaScript needed for the button handling and the update of the webpage.
j.js is a file containing JavaScript. Main function is to fetch data periodically from the server and to update the fields and buttons on the webpage. Furthermore it contains some functions to react on button presses and slider movements.
json is plain data sent from the server to your browser containing actual values in JSON format. This json files will be parsed by the JavaScript.
cmd is a resource on the sever to retrieve data from your browser. Every time you press a button or move a slider, the new data will be sent to cmd. For example the ESP can switch on or off the pin you have triggered in the browser.
f.css is a CSS (a stylesheet) to make the layout of the webpage nicer. The sliders and the rocket switches are pure HTML elements and only styled by CSS. The main colors are using CSS variables, so you only have to change the colors in the root selector and every element using the variable should be changed accordingly.
data is a resource on the server which can receive data from a webclient. In this usecase data is also responding with some payload.
Then there are some helper functions:
handleNotFound() will give a typical "404 not found" page if the user requests a non existing page.
handle204() will respond with HTTP code 204 "no content". This is used to indicate the browser that the request was processed but no further content will be responded. This is a fast way to respond to favicon.ico requests.
addTop() and addBottom() are sub functions adding the top and the bottom of the HTML to a page to get a consistent header/navigation/footer style through all pages.
Additonal Note: OTA
The sketch adds OTA (over the air) update capability. This means you can update your ESP8266 via WIFI without a serial connection.
Summary
The ESP8266 / ESP32 webserver can be used to switch pins (LEDs, Relays) with your webbrowser. A CSS stylesheet can be used to design the layout of your page. Updates of values can be done using the Fetch API and JavaScript.