Arduino Display Library for Neopixel/WS2812

Neopixel / WS2812 are a great invention and very often used in Arduino projects. With lot of Neopixels the making of large displays is possible. In this blog I will introduce my library to simulate displays in the look and feel of a seven segment LED Display.
The Noiasca Neopixel Display Library
The "Noiasca Neopixel Display" library is an addon to Adafruits Neopixel library. It uses the functionalities from Adafruit and makes handling of large displays very easy. Currently the main focus is the simulation of "seven segment displays". You can use this library for big clocks, scoreboards and similar use cases.
Assign Neopixels to the Seven Segments
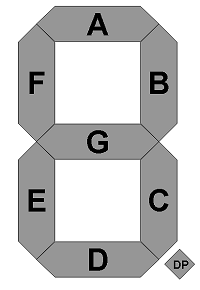
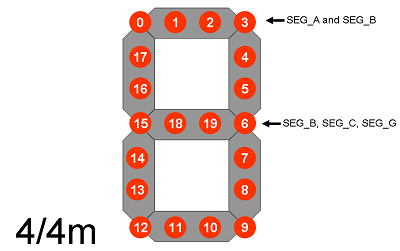
Neopixel displays can be built in individual ways. You have to define which pixel belongs to which segment. A digit consists of 7 segment and optionally one segment for the decimal point. The segments are ordered clockwise, starting at the top:
First step you need to do is to assign your pixels to each segment. Let's assume following wiring for a 1 by 1 single pixel usage:
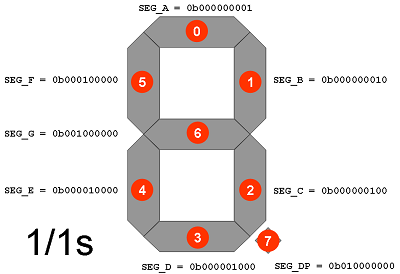
This gives you following definition:
typedef uint8_t segsize_t;
const segsize_t segment[8] {
 0b00000001, // SEG_A
 0b00000010, // SEG_B
 0b00000100, // SEG_C
 0b00001000, // SEG_D
 0b00010000, // SEG_E
 0b00100000, // SEG_F
 0b01000000, // SEG_G
 0b10000000 // SEG_DP
};
The library uses your definition of pixel per segments and lights the necessary pixels for all needed segments.
The Flexibility of Pixel - Segment Mapping
If your wiring has a different order, just adopt the mapping. Lets do another example with two pixels per each horizontal and vertical segment:
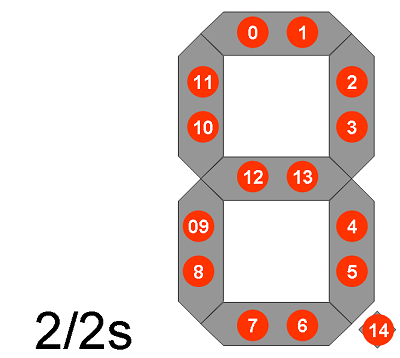
In this case you need up to 14 pixels per digit and one for the decimal point. Therefore you have to use a 2byte (16bit) variable to store the definitions:
typedef uint16_t segsize_t;
const segsize_t segment[8] {
  0b0000000000000011,  // SEG_A
  0b0000000000001100,  // SEG_B
  0b0000000000110000,  // SEG_C
  0b0000000011000000,  // SEG_D
  0b0000001100000000,  // SEG_E
  0b0000110000000000,  // SEG_F
  0b0011000000000000,  // SEG_G
  0b1100000000000000   // SEG_DP
};
You can even go higher: lets assume a display with 3 pixels per vertical and horizontal segment.
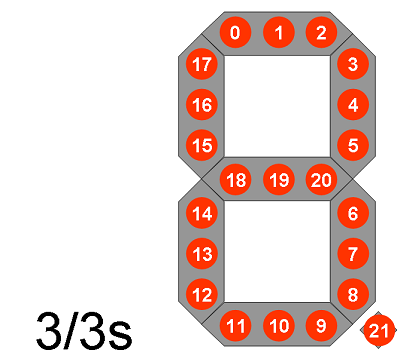
In total 22 pixels per digit. 22 pixels don't fit in a 16bit bitmap. Therefore you have to choose the next larger variable size: uint32_t. Writing 32bit values in binary might look cumbersome:
const segsize_t segment[8] {
  0xb00000000000000000000000000000111,  // SEG_A
As alternative you can use the "bit value makro"
bit() to assign the pixels to you
each segment.
Example:
bit(0) = 1
bit(1) = 2
bit(2) = 4
You can combine (aggregate, OR) this values to get the same result as above. So
you can write:
typedef uint32_t segsize_t;
const segsize_t segment[8] {
  bit(2) | bit(1) | bit(0),     // SEG_A
  bit(5) | bit(4) | bit(3),     // SEG_B
  bit(8) | bit(7) | bit(6),     // SEG_C
  bit(11) | bit(10) | bit(9),   // SEG_D
  bit(14) | bit(13) | bit(12),  // SEG_E
  bit(17) | bit(16) | bit(15),  // SEG_F
  bit(20) | bit(19) | bit(18),  // SEG_G
  bit(21)                       // SEG_DP
};
Just keep in mind, that Arduino defines this makro as
#define bit(b) (1UL << (b))
and therefore this works only up to 32bit on an Arduino UNO/NANO/MEGA.
Using an individual bitmap/mapping for each segment enables you, to define a
display like this
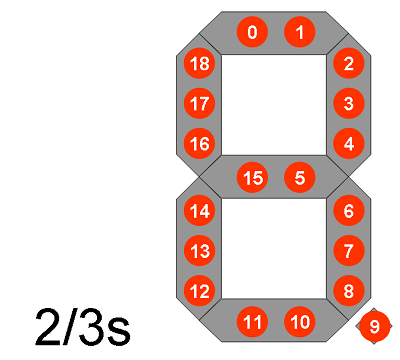
Each segment consists of 4 pixels, but some pixels are in mixed usage. E.g. pixel 3 is used for segment A and B, pixel 6 is used for segment B, C and G. The same applies for 9, 12 15 and 0. You can reuse pixels in any segment:
typedef uint32_t segsize_t;
const segsize_t segment[8] {
bit(3) | bit(2) | bit(1) | bit(0),    // SEG_A
bit(6) | bit(5) | bit(4) | bit(3),    // SEG_B
bit(9) | bit(8) | bit(7) | bit(6),    // SEG_C
bit(12) | bit(11) | bit(10) | bit(9), // SEG_D
bit(15) | bit(14) | bit(13) | bit(12),// SEG_E
bit(18) | bit(17) | bit(16) | bit(15),// SEG_F
bit(15) | bit(20) | bit(19) | bit(6), // SEG_G
0                                    // SEG_DP
};
If your digit doesn't have a decimal point, just leave it 0.
You can define your segments very flexible. Lets try a 2 pixel horizontal/3pixel vertical digit. Assume a prewired Neopixels string and just follow the shortest way from pixel to pixel like a snake. Pay attention on the pixels of segment G and the decimal point:
The segment mapping will look like following:
typedef uint32_t segsize_t;
const segsize_t segment[8] {
bit(1) | bit(0),
bit(4) | bit(3) | bit(2),
bit(9) | bit(8) | bit(7) | bit(6),
bit(11) | bit(10),
bit(14) | bit(13) | bit(12),
bit(18) | bit(17) | bit(16),
bit(15) | bit(5),
bit(9)
;
As you can see, the order of pixels doesn't matter. It's all about the assignment of pixels to the segment.
Additional Pixels - The 12h Clock Layout
Sometimes you don't need the decimal point but you have additional pixels in your display between digits. The following example shows a simple 12h clock display with a colon between hour and minute:
Using a basic 2/2s design, each individual digit consists of maximum 14 pixels. But after the second digit we use two pixels to blink in intervals. Therefore you need to inform the Adafruit strip object and the Noiasca Neopixel Display object, that you have a design with two additional pixels. Use a constant for this:
const byte addPixels = 2;
adopt the calculation of the total number of pixels
const uint16_t ledCount(pixelPerDigit * numDigits + addPixels);
You also have to provide information about WHERE these pixels are. This is done by "callback function". You have to define this callback function in your sketch. For this example let's assume, that after two digits, you want to add an additional offset of two pixels (28, 29) just before the pixels for the 3rd digit will start:
int offsetLogic_cb(uint16_t position)
{
uint16_t offset = 0;
if (position > 1 ) offset = addPixels;
return offset;
}
It's up to you how you name your callback function, but it MUST return an int and it MUST be able to receive an uint16_t parameter. Each time the library writes a new character to the display, it calls your callback function to determine, if an additional pixel offset is needed before printing. With this method you have full external control about how often and where you need additional pixels. As input parameter you will get the current position (digit from LEFT, starting with 0) and you have to return your desired offset in pixels. As an example, if digit position 0 doesn't need any pixel offset, return 0.>
To make things easier in the current stage, add one additional constant. I will explain it in the next chapter:
const byte startPixel = 0; // start with this pixel on the strip
Now you have all necessary components and you can call the constructor:
Noiasca_NeopixelDisplay display(strip, segment, numDigits, pixelPerDigit, startPixel, addPixels, offsetLogic_cb);
Your display object is now aware of the additional pixels, the display can handle the offset and the initialization of your strip will work correctly.
Reversing the order of positions
In the display layout above, the pixels for the digits are wired from RIGHT to LEFT. Usually we consider to have the positions from LEFT to RIGHT. Therefore we have to inform the library about the reversed order of digits. This is done with a separate setter during setup()
display.setRightToLeft();
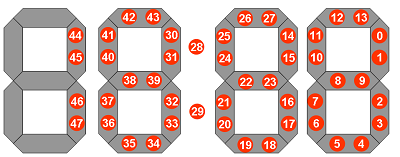
 As you might have seen in the diagram, I only use the segments B and C for
the ten hour digit. That is just because I wanted to have an example for a
maximum of 50 pixels using a prewired string. Therefore I started the pixels
with segment B, so that there are enough pixels left for the 10 hour digit. If we
just want to display 0:00 - 12:59 - this display will perfectly work.
As you might have seen in the diagram, I only use the segments B and C for
the ten hour digit. That is just because I wanted to have an example for a
maximum of 50 pixels using a prewired string. Therefore I started the pixels
with segment B, so that there are enough pixels left for the 10 hour digit. If we
just want to display 0:00 - 12:59 - this display will perfectly work.
Of course you can wire the missing pixels also and the clock can go up to 23:59.
Multiple Displays on one Stripe - A simple Scoreboard
If you don't want to handle all pixels as one display you can split the strip into multiple virtual displays on one strip driven by one GPIO. Let's assume a scoreboard with two separate counters for two players and 4 additional pixels for a countdown:

We have one long string, two separated displays and 4 separate indicators.
The Adafruit pixel has to be initialized with the total number of pixels: 60 in total.
Adafruit_NeoPixel strip(60, ledPin, NEO_GRB + NEO_KHZ800);
The used constructor format for this Neopixel Display is:
Noiasca_NeopixelDisplay display Object (strip, segment, numDigits, pixelPerDigit, startPixelA);
You have to define two displays:
Noiasca_NeopixelDisplay displayA(strip, segment, 2, 14, 0);
Noiasca_NeopixelDisplay displayB(strip, segment, 2, 14, 32);
 Both displays are using the same strip object
on the same GPIO pin. For displayA you use
the pixels 0 - 27. As you define 2
digits with 14 pixels each, the library will calculate the last pixel 27
internally. The same applies for displayB:
the displayB starts at pixels
32 + 2 digits * 14 pixels. The last used digit
on displayB will be 59. The additional pixels
don't belong to neither display, therefore we don't need to provide an
information to the displays.
Both displays are using the same strip object
on the same GPIO pin. For displayA you use
the pixels 0 - 27. As you define 2
digits with 14 pixels each, the library will calculate the last pixel 27
internally. The same applies for displayB:
the displayB starts at pixels
32 + 2 digits * 14 pixels. The last used digit
on displayB will be 59. The additional pixels
don't belong to neither display, therefore we don't need to provide an
information to the displays.
Now you can handle each display individually: either displayA.print() for playerA or displayB.print() for playerB. You can address the additional pixels (28 - 31) with the standard functions from Adafruit library (i.e. strip.setPixelColor(28, 0xFF0000)). For the scoreboard an example sketch is included with the library examples.
Library Examples
The library comes with lot of examples, here are some of them:
| Example | Purpose |
|---|---|
| 01_hello_world | strand test to see everything is working |
| 02_basic_example | different print methods |
| 03_counter | a simple counter to check your display |
| 20_additional_pixels | Usage of additional pixels in the strip |
| 30_clock_basic | a simple HH:MM:SS clock (without RTC) |
| 31_clock_rtc | a HH:MM:SS clock (with DS3231 as RTC) |
| 40_scoreboard | a scoreboard for two players counting points |
| 64_large_display_64bit | how to define large displays with 33 - 64 pixels per digit |
| 90_development | this is my test skech/sandbox for some internal tests |
If you have any ideas or a specific use case, just come up with the idea you want do get added.
The Neopixel Display Documentation
The Neopixel Display Constructor
There a several possibilities to create a Neopixel Display object. The simplest constructor needs 4 parameters:
Noiasca_NeopixelDisplay display(strip, segment, numDigits, pixelPerDigit);
- strip
- the first parameter is the reference to the Neopixel strip object you have created with the Adafruit library. This parameter assigns to which strip your display should use
- segment
- this has to be the array with your mapping/assignment of pixels to each segment
- numDigits
- Each display consist of 1 or more individual digits
- pixelPerDigit
- With this parameter you define how many pixel are used for each digit. Also take the decimal point in consideration if you using it
The constructor with 5 parameters:
Noiasca_NeopixelDisplay display(strip, segment, numDigits, pixelPerDigit, startPixel);
- startPixel
- if you are using one long strip with multiple logical displays, you have to define the startPixel for each display on the strip.
The constructor with 6 or 7 parameters:
Noiasca_NeopixelDisplay display(strip, numDigits, pixelPerDigit, startPixel, addPixels, callbackFunction);
- addPixels
- if you have scattered pixels between digits you have to inform the object about these additional pixels and you should define the additional callback function where the pixels are located.
- callbackFunction
- pass the callback Function with your offset logic to the display. This parameter is optionally, if you don't need an offset calculation, you can skip this parameter.
These constructors gives you a lot of possibilites:
- one strip as one display
- one strip with two (or more) similiar displays
- one strip with two (or more) different displays - just use a separate segment definition
You are not limited to one strip in your sketch. If you want to split your displays using more Arduino pins, just declare more Adafruit strip objects and assign the strips in your display objects.
Important Methods and examples
Here are some of the most important methods:
void clear(void)
clears the display. To be precise: this method sets all pixels of the current display to the current background color. If you are using multiple displays on one string, clear() will NOT clear the strip - only the pixels of that logical display.
void setColorBack(uint32_t newColor)
sets the background color. Default is 0x000000 (black).
void setColorFont(uint32_t newColor)
sets the font color. Default is 0xFF0000 (red). Each character can have it's own color.
void setCursor(uint8_t newPosition)
sets the cursor for the next writing operation to the definied new position
void setRightToLeft()
reverses the display lowest pixel on the right - highest pixel on the left. Call this method once in setup().
void setPixelColor(uint16_t n, uint32_t c)
this is just a pass through method to the Adafruit Neopixel stripe. n is the pixel, c is the color.
void show()
this is just a pass through method to the Adafruit Neopixel stripe and updates the display.
void writeLowLevel(uint8_t position, segsize_t bitmask, bool addOnly = false)
sends the provided bitmask directly to the given position. If the third parameter is set to true, the bitmask will be added to the existing position.
size_t write(uint8_t value)
this is the write method like you know from other libraries supporting .print/.println
display.write(127);
Character 127 lights up all 7 Segments including the decimal point. Its like printing "8." to a digit and can be used for a first check if every pixel is defined correctly.
display.print
display.println
the print/println methods are acting like you are used to from other libraries. They take a lot of different parameters and can be used with the F-Makro.
General Limitations of 7 Segment Displays
There are a some restrictions on 7 segment displays regarding printable characters, and all this restrictions are true for the Noiasca Neopixel Display library also. This is a limitation of the usable character set of a seven segments of the display itself, not of the library. Speaking about character sets, the Noiasca Neopixel Display library supports printable characters 0d32 to 0d127 from the ANSI character table. So yes - you also can print letters and some special characters on your display with this library.
Points, Dots & Comma
Using points, dots & commas need some additional explanation: As printing to the display is done character by character we have to find a way how to "activate" the decimal point of a previous printed digit. This is simply done by storing the position of the last printed character. Therefore we can add the decimal point to the last printed digit.
This works quite well - up to the point if the previous character was also a dot. I.e. you can easily print a dot after another character - but not a dot after a dot.
So this is will not be possible:
...
instead print a blank before the next dot, like following:
. . .
This will be shown up correctly on the display - and if you carefully check your display it IS exactly what you want: the 7 segments must not be enlightened (all off) - but the decimal point does. So it makes absolutely sense to print blanks between multiple dots on a 7 segment display.
End of Line
If we come to the "last" digit of our display, we have to to decide what should happen with the next character. By default the library jumps to first the first position.
The Linefeed and the Carriage Return
In this library, linefeed (LF, 0d10, 0x0A, \n) and carriage return (CR, 0d13, 0x0C, \r) will have no special effect. Both characters are below 0d32 and therefore classified as not printable.
RAM and Flash Usage
The Noiasca Neopixel Library adds some Flash and RAM usage on top on Adafruit library. Flash is mainly used for the character set, RAM usage is around 20 byte. The print class will cost some extra RAM and flash. Nevertheless it will help you saving A LOT more RAM and flash memory the more you will print to your display. Mostly you will use the Serial.print anyway in your sketch - so lot of code of the print and stream libraries needs already compiled to your sketch and this Neopixel display library is just reusing this code. If you do a comparisons - just don't give up after the first line. Try a more complex example with lot of text and see, how easy it becomes with the Noiasca Neopixel Library.
Alternatives
Currently I haven't found any other open Neopixel Display library. If you are aware of any other Neopixel Library supporting seven segment style I appreciate your feedback.
Installation and usage of the Noiasca Neopixel Display Library
Download the ZIP (at the end of this page) and unzip it to your libraries folder. It might be necessary that you have to restart your Arduino IDE before you can use the library.
Start with the 10_HelloWorld example. The display should show a basic 1234. Then continue with the other examples in ascending order.
a) Include the new library into your sketch with
#include <Noiasca_NeopixelDisplay.h>
b) the library files
In general, there is no need to change anything in the .h/.cpp files of the library. All hardware relevant settings can be done in your sketch. Just use the proper constructer and the right parameters for your display. I don't like libraries when they force one to "manipulate" properties in any file. There is only one exception to this rule: If you like to have debug messages from the library, this can be activated - as in most libraries - in the .h header file.
c) see the examples
I've added some examples to make it easier to understand the functionality of the library. The first sketch should always be some "strand test / hello world" to find out if your hardware works with the new software.
Supported Hardware
As the library relies on Adafruits Neopixel library, any supported Adafruit Neopixel should be supported also by Noiasca Neopixel Display Library.