
The LCD RGB KEYPAD for RPi and the Arduino
There are I2C LCD shields available advertised for the Raspberry Pi. These LCD modules are using a MCP23017 and are equipped with a RGB LED and 5 push buttons. Let's try to connect them to an Arduino or an ESP8266.
The LCD RGB KEPAD for RPi - Overview
The LCD RGB KEYPAD for RPi comes with following features:
- A 16bit I2C port expander based on a MCP23017
- 5 push buttons
- a RGB LED
- a 1602 LCD with white characters and blue backlight
The I2C Expander MCP23017 for the LCD
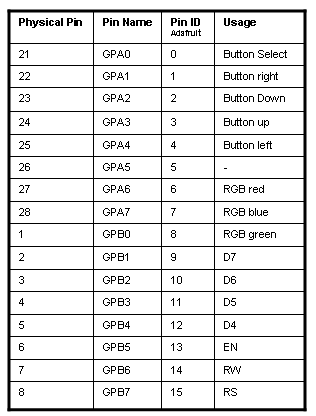
As port expander a MCP23017 is used. The MCP23017 has 16 bits (channels), 7 channels are connected to the LCD in 4 bit mode, 3 channels are used for the RGB LED and 5 channels are inputs connected for the 5 buttons. One channel (GPA5) remains unused.
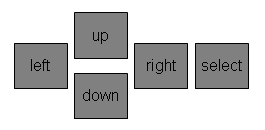
I name the push buttons like following:
Connecting the Raspberry LCD Module to an Arduino or an ESP8266/ESP32
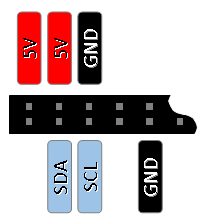
The 26 pin header follows the pin layout of the Raspberry Pi. To connect the display to another microcontroller you can use Dupont wires on pin 3 (SDA), pin 5(SCL), pin 4 (5V) and pin 6 (GND).
The pin layout on the RPi header looks like following:
The Hardware Driver for the MCP23017
The Noiasca LCD library offers a class for I2C displays connected with a MCP23017. It uses the 4bit mode. The RW pin is connected but unused.
The necessary #include and the constructor are:
#include <NoiascaLiquidCrystal.h>
#include <NoiascaHW/lcd_MCP23017.h>
LiquidCrystal_MCP23017_custompin lcd(addr, rs, rw, en, d4, d5, d6, d7, bl, POSITIVE, cols, rows);
Remember to add a Wire.begin() to your setup() like in the examples, as this will not be done in the library.
Noiasca Liquid Crystal and the Raspberry LCD Module
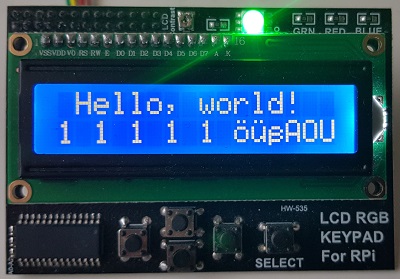
The "Noiasca Liquid Crystal" library does a character mapping from UTF-8 to the existing characters in the LCD ROM. As example some special characters in the second row of the display:
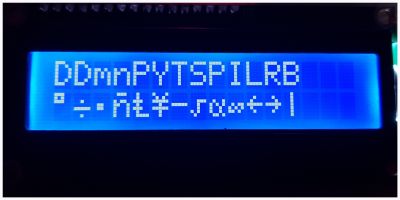
(Degree, Division, middle Point, n with tilde, Pound, Yen, Tilde, Sqareroot, Proportional to, Infinity, Left Arrow, Right Arrow, Backslash)
You can read more about this character mapping in the Introduction or in the German section of this site. For the beginning you should just know that you don't need to enter the octal ROM addresses of the special characters manually and these print can be done by a simple:
lcd.print("°÷·ñ£¥~√∝∞←→\\");
The backlight of the cheap LCD RGB KEPAD for RPI is always on, you can't disable it.
The RGB LED
The LED on the "LCD RGB KEPAD for RPI" occupies 3 GPIOs of the MCP23017. Before you can use a pin as output, you must setPinMode to OUTPUT.
lcd.setPinMode(rgbBlue, OUTPUT); // set the RGB pins to outputs
Now you can use the well known digitalWrite to switch the pin HIGH or LOW
lcd.digitalWrite(rgbBlue, LOW);
The LEDs are low active, switch to LOW will enable the LED and HIGH will switch it off.
The Push Buttons
The 5 push buttons will connect a expander IO to GND. Therefore you should activate the built in pullups resistors of the MCP23017:
lcd.setPinMode(buttonPin, INPUT_PULLUP);
Now you can read the state of a button with a simple
buttonState = lcd.digitalRead(buttonPin);
Remember: By using the INPUT_PULLUP you will read a HIGH if the button is released and LOW if the button is pressed.
Additional methods for the MCP23017 displays
Before you use other pins of the MCP23017 set the pinMode to either OUTPUT, INPUT or INPUT_PULLUP
lcd.setPinMode(pin, OUTPUT);
To switch a pin use
lcd.digitalWrite(pin, HIGH);
To read a pin use
byte state = lcd.digitalRead(pin);
LCD Examples for the MCP23017
All LCD examples regarding displays with MCP23017 can be found in the folder 03_I2C_MCP23017.
Your own Character Converter
If you need a different character converter you can hand over a callback function as optional last parameter.
Obviously - you also have to implement the callback function to do all the magic.
See the examples in the folder "50_Convert" how to write your own character converter.
German Umlauts
For my German readers: the default constructor enables the support for the small letters ä ö ü and ß. The large German umlauts Ä Ö Ü (with diaeresis) will be converted to their counterpart A O U. If you want to try other variants, you can hand over different callback converter functions:
LiquidCrystal_MCP23017_custompin lcd(addr, rs, rw, en, d4, d5, d6, d7, bl, POSITIVE, cols, rows);                    // Ä becomes A
//LiquidCrystal_MCP23017_custompin lcd(addr, rs, rw, en, d4, d5, d6, d7, bl, POSITIVE, cols, rows, convert_ae);      // Ä becomes Ae
//LiquidCrystal_MCP23017_custompin lcd(addr, rs, rw, en, d4, d5, d6, d7, bl, POSITIVE, cols, rows, convert_small);   // Ä becomes ä
//LiquidCrystal_MCP23017_custompin lcd(addr, rs, rw, en, d4, d5, d6, d7, bl, POSITIVE, cols, rows, convert_special); // Ä becomes Ä
Summary
The MCP23017 class in "Noiasca Liquid Crystal" enables you to run LCDs with a MCP23017 as I2C port expander and adds more IOs for your usage.