Fun with millis(): Ramping Servo Movements

In this series I want to show short snippets of code around millis(). Here we will use millis() to control the movement of a RC servo with a ramp. If you use a servo.write(90) to set a new position of the servo, the servo will move very fast to the new position. By using millis() we can not only slow down the movement but also let the servo start slow, increase the speed and decrease the speed at the end of the movement. This gives a smooth servo movement.
You could use delay to slow down the movement, but as the series is called "Fun with millis()" we will write a non blocking code based on millis(). Furthermore this method can be used to apply ramping servo movements to several servos.

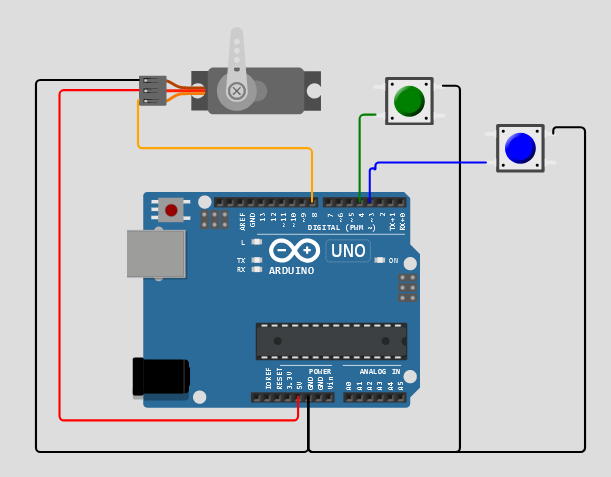
The Servo Circuit
For this sketch we will need a servo connected to the Arduino and we add two buttons to start movements.
A Ramping Servo Object
The Arduino "Servo.h" library offers a easy way to control servos. We will create our own servo class based on Servo.h and add some member function to gain a ramping movement.
/*
   move Servos with rampup/rampdown speed
   ramp done by time

   by noiasca
   2022-10-29 RampServo - https://wokwi.com/projects/346855291487257172 for https://forum.arduino.cc/t/problem-mit-der-servobewegung-bei-mobatools/1047250/11
   2022-09-12 SmoothServo https://wokwi.com/projects/342593181270934099  for  https://forum.arduino.cc/t/mehrere-servos-synchron-ansteuern/1030870/20
*/

#include <Servo.h>

constexpr uint8_t openPin {4};     // GPIO for servo movement
constexpr uint8_t closePin {3};    // GPIO for another servo movement
constexpr uint8_t servoAPin {8};   // GPIO for servo A

// make your own class of servos
class RampServo
{
  protected:
    const uint8_t startInterval {10};  // slow speed for start
    uint16_t target {90};              // target angle
    uint16_t current {90};             // current angle
    uint8_t interval {startInterval};  // delay time
    uint32_t previousMillis {0};       // last movement
    uint16_t minInterval {5};          // interval after rampUp/before ramp/down (=max Speed)
    uint8_t rampUp{30};                // angle used for ramp up
    uint8_t rampDown{10};              // angle used for ramp down
    uint16_t angleStart{90};           // what was the start angle

  public:
    Servo servo;

    void begin(const byte pin)
    {
      servo.attach(pin);
      servo.write(target);   // bring the servo to a defined angle
    }

    void set(uint16_t target, uint16_t minInterval = 1)
    {
      this->target = target;
      this->minInterval = minInterval;
      angleStart = current;
      interval = startInterval;
    }

    //      ____
    // ____/    \____
    //     u    d
    void update(uint32_t currentMillis = millis())
    {
      if (currentMillis - previousMillis > interval && current != target)  // slow down the servos
      {
        previousMillis = currentMillis;
        int16_t total = angleStart - target;   // total way
        int16_t remaining = current - target;  // rest way
        total = abs(total);
        remaining = abs(remaining);
        if (remaining < rampDown)
        {
          //Serial.println(F("ramp Down"));
          if (interval < startInterval) interval++;  //rampDown --> geschwidigkeit vermindern / interval erhöhen
        }
        else if (remaining > rampUp)
        {
          //Serial.println(F("ramp Up"));
          if (interval > minInterval) interval--;  //rampUp --> geschwindigkeit erhöhen/interval reduzieren
        }
        //Serial.print(F(" interval=")); Serial.println(interval);
        if (target < current)
        {
          current--;
        }
        else if (target > current)
        {
          current++;
        }
        servo.write(current);
      }
    }
};

RampServo servoA;  // create a servo object


void setup()
{
  Serial.begin(115200);
  servoA.begin(servoAPin);          // start the servo object

  pinMode(openPin, INPUT_PULLUP);
  pinMode(closePin, INPUT_PULLUP);
}

void doorOpen()
{
  Serial.println(F("move open"));
  servoA.set(0);     // new angle

  //servoA.servo.write(90); // hardcoded write
}

void doorClose()
{
  Serial.println(F("move close"));
  servoA.set(180);

}

void loop()
{
  // read buttons, sensors...
  if (digitalRead(openPin) == LOW) doorOpen();
  if (digitalRead(closePin) == LOW) doorClose();

  // call all servos
  uint32_t currentMillis = millis();
  servoA.update(currentMillis);  // call the update method in loop

}
The member function void begin(byte pin)
The member function begin() takes one parameter: the pin where we will connect the servo pin to. This function replaces the attach method of the Servo class. Call the begin function in your setup.
The member function void setSpeed(uint8_t newSpeed)
With this member function you can influence the speed of the servo movement. Higher values will result in a longer "delay" between each move.
The member function void set(uint16_t newTarget, uint16_t minInterval = 1)
This member function replaces the "servo.write(newAngle)". It sets the new target value for the servo angle. Optionally you can decrease the speed of the movement by setting a higher interval.
The member function void update()
update() is the run method. It will adjust the current angle in the proper interval until the target angle is reached. Call this member function for all your servo objects in your loop().
The movement of the Servo is splitted in 3 phases:
- the rampup
- the fast movement
- the ramp down
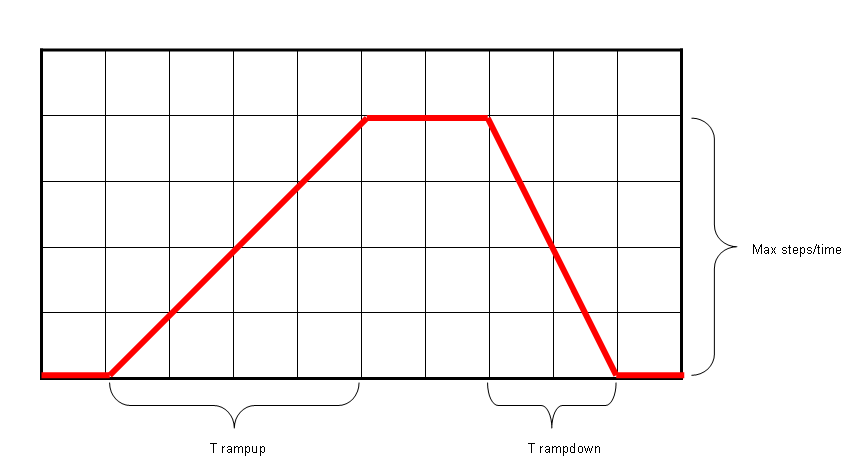
The movement starts with a slow speed and increases the speed during ramp up. If the speed reaches the final speed, the movement will continue until the servo comes close to the end of the target angle. The movement will be slowed down (=ramp down).
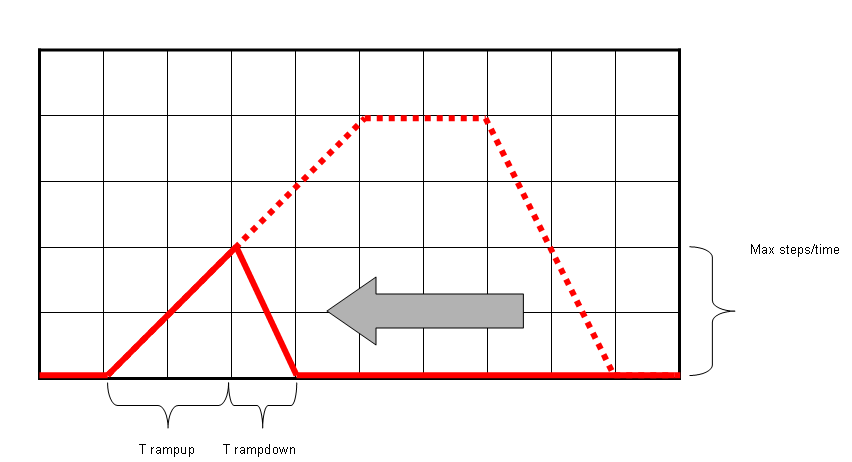
It the movement is shorter than ramp up and ramp down the ramp up will be shortened so that the ramp down can be executed to ensure a smooth movement.
Summary
You see, slowing down actions on the Arduino is quite easy using millis(). There is no need to block the code with a delay().