A reliable Arduino Webserver and how to POST data

Examples of how to use the POST method with an Arduino are seldom. Most of the examples try to send data with GET. But data shouldn't be send with GET. Use POST to post data!
First we will check why the minimal sketch in the IDE Ethernet | Webserver is just a start and what we can do better. Then we check the different methods to bring data to the webserver (GET vs. POST) and finally we learn how to serve more pages and even images on the Arduino. In total you will need approx. 45 minutes to learn how to write a proper webserver for the Arduino.
One more thing ahead: This webserver works well for the Arduino UNO / Nano / Pro Mini and Arduino MEGA. If you are using an ESP8266 / ESP32 you don't have to do that all manually - there are existing libraries for ESP processors.
Requirements for our Arduino UNO Webserver
For our Arduino UNO Webserver we formulate following requirements:
- be able to handle pages (handle GET Requests)
- non existing pages should bring a HTTP 404 page
- be able to receive data from the user (handle POST requests)
- handle the browser favicon.ico correctly
- as we are on a Arduino UNO: avoid any usage of Arduino-Strings
- keep the loop() as tidy as possible, handle everything in separate functions
The IDE example Ethernet | Webserver
... and why it's a problematic ...
The example Ethernet | Webserver provided in the IDE is only a minimal variant of a webserver. Every method, every input is accepted and leads to the output of a page. It uses the GET method to accept user data transferred from the browser to the Arduino.
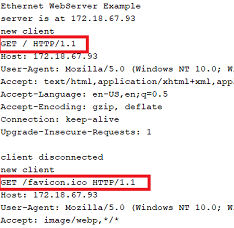
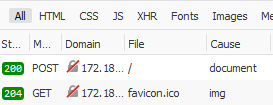
I also recommend that you check the network traffic caused by the example (e.g. in Firefox under Tools | Web Developer | Network). The browser (like Firefox and others) not only requests the page from the address bar, but also a favicon.ico - a small graphic that (if available) is shown on the page tab in the browser.
Let's see what's happening:

The server simple answers each page request (GET) with the output of the HTML. When you check the serial monitor you see the two incoming requests:
A webserver should handle all requests accordingly.
Differences between POST and GET
Long story short:
GET requests append parameters to the URI/URL after a question mark (page.htm?parameter). The user will see the data in the browser address field. GET requests are for retrieving data, like "GET a resource from the server". For example "GET the page 1.htm". Yes you can handover parameters, but these should be related to the resource.
The HTTP header for this kind of requests looks like:
GET /1.htm?content=1&anotherParameter=aText HTTP/1.1
HOST: 172.18.67.93
Content-Length: 0
Now let's talk about POST requests: these are used to transfer data from the user (browser) to the server.
In a POST request the data will be transmitted in the HTTP body of the request. The HTTP header ends with an empty line before the HTTP body starts:
GET /form.htm HTTP/1.1
HOST: 172.18.67.93
Content-Length: 24

content=1&anotherParameter=aText
You see, the browser transmits the same kind of parameters (without the question mark).
Therefore a webserver must check the whole message: Check if it is a GET or a POST request, retrieve the requested URI and any GET parameters. In case of a POST request, read through the HTTP header up to the empty empty line and than read the message for POST parameters.
How to implement an Arduino UNO Webserver accepting POST data
To send POST data, we use the Arduino UNO itself and host an input form that sends data to the Arduino using POST. In theory, another client could also send data to our Arduino web server using POST. For an example implementation, we make a simple Arduino webserver with a POST form that can switch some LEDs on and off using form buttons. That's very similar to what the IDE example does.
The setup() can essentially be taken from the IDE example Ethernet | webserver. The loop() only contains a new function call which is responsible for our webserver:
#include <SPI.h>
#include <Ethernet.h>

byte mac[] { 0x52, 0x64, 0x75, 0x69, 0x6E, 0x6F };
IPAddress ip( 172, 18, 67, 93 );
EthernetServer server(80); // Port 80 is HTTP port
const byte ledPin[] {2, 3, 4, 5, 6, 7, 8, 9};

void setup()
{
  Serial.begin(115200);
  Serial.println(F("\nsimple webserver"));
  for (auto &pin : ledPin) {
    pinMode(pin, OUTPUT);  // Set the digital pins ready to write to
  }
  Ethernet.begin(mac, ip); // Start the Ethernet shield
  printHardwareInfo();
  server.begin();          // Start the webserver
  Serial.print(F("server available at http://"));
  Serial.println(Ethernet.localIP());
}

void loop()
{
  checkForClient();
}
That's all. You have to define MAC and IP, an array with the GPIO pins for the LEDs, define them as output and use the begin methods for the network-shield.
We put all the server code in a separate tab. So use "New Tab" and name the tab "server". Create a new function and put all the previous loop() code from the example to your function
void checkForClient();
{
  // put all the loop() code from the IDE example in here
  ...
}
For first testing, you can compile the sketch an upload it to your Arduino - it should work like the original sketch.
Designing our own HTML page on the Arduino UNO/NANO/MEGA
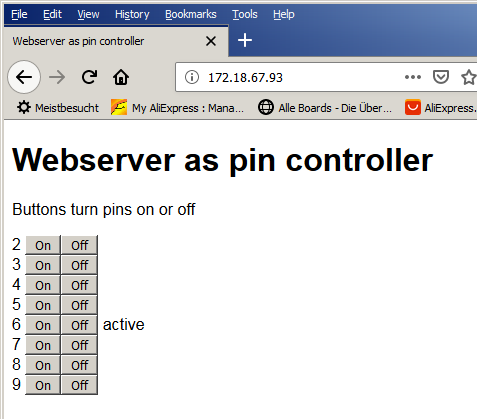
Our HTML page - keep it small and simple - will be in a separate function. First, we still need the HTTP header which returns a HTTP response code 200. Since we do not send any content length, we use "HTTP/1.0". After the blank line, we send the HTTP body - that is the HTML page we want see in the browser window. It is a simple HTML5 page with an input form and two buttons for each pin from the ledPin array. Don't use client.print for each line as this will split the transmitted packages to the browser. If you want to add a linefeed in your HTML source, add \r\n to your line. Use as less client.print as possible:
void sendPage(EthernetClient &client)
{
  // Serial.println("[server] 200 response send");
  client.println(  "HTTP/1.0 200 OK\r\n"
                   "Content-Type: text/html\r\n"
                   "\r\n" // a blank line to split HTTP header and HTTP body
                   "<!doctype html>\n" // the HTTP Page itself
                   "<html lang='en'>\n"
                   "<head>\n"
                   "<meta charset='utf-8'>\n"
                   "<meta name='viewport' content='width=device-width'>\n"
                   "<title>Webserver as pin controller</title>\n"
                   "</head>\n"
                   "<body style='font-family:Helvetica, sans-serif'>\n"
                   "<h1>Webserver as pin controller</h1>\n"
                   "<p>Buttons turn pins on or off</p>\n"
                   "<form method='post' action='/' name='pins'>");
  for (auto &pin : ledPin)
  {
    //client.print(  "<p>" );
    client.print(pin);
    client.print(  " <input name='pinD" );
    client.print(pin);
    client.print(  "' type='submit' value='On'>" );
    client.print(  "<input name='pinD" );
    client.print(pin);
    client.print(  "' type='submit' value='Off'>" );
    if (digitalRead(pin)) client.print( " active" );
    client.print(  "<br>\n" );
  }
  client.print ( "</form>\n" );

  client.print ( "</body>\n</html>" );
  client.stop();
}
Note: Do not use the F-Makro in combination with client.print because it will slow down your server response. I will show later an option how too save precious RAM and get a fast server.
The body-style is optional, it just uses fonts without serifes.
The sketch will not work currently, but as a teaser, we will get something like this:
To read the HTTP header and HTTP body you will use a state machine. To avoid magic numbers in the code you use an enum class with this four states:
- REQUEST ... read the method (GET or PRINT), the URI and the GET parameters
- CONTENT_LENGTH ... read the request length
- EMPTY_LINE ... await the empty line
- BODY ... read data from the the HTTP-body
This is a simple "enumeration class", you need a status variable to store the actual status, and you start with the status "REQUEST":
enum class Status {REQUEST, CONTENT_LENGTH, EMPTY_LINE, BODY};
Status status = Status::REQUEST;
So we can adopt the IDE example. The server should read the client data line by line. When you have received an "end of line" handle according your state machine.
while (client.connected()) {
  while (client.available()) {
    char c = client.read();
    Serial.print(c);
    if ( c == '\n' )
    {
      if (status == Status::REQUEST)
      {
        status = Status::EMPTY_LINE;
      }
      else if (status == Status::CONTENT_LENGTH)
      {
        status = Status::EMPTY_LINE;
      }
      else if (status > Status::REQUEST && i <= 2) // check if we have an empty line
      {
        status = Status::BODY;
      }
      else if (status == Status::BODY)
      {
        strlcpy(postParameter, lineBuffer, smallbuffersize);
        break; // we have received one line payload and break out
      }
      i = 0;
      strcpy(lineBuffer, "");
    }
    else
    {
    if (i < buffersize)
    {
      lineBuffer[i] = c;
      i++;
      lineBuffer[i] = '\0';
    }
  // MISSING: for future use: read content length
  }
}
if (status == Status::BODY) // status 3 could end without linefeed, therefore we takeover here also
{
  strlcpy(postParameter, lineBuffer, smallbuffersize);
}
The first line is very complex. The HTTP request begins with the METHOD, a blank separates the URI with any parameters and finally a blank again and the distinction whether it is a HTTP/1.0 or HTTP/1.1 request. You are only interested in the METHOD, the requested URI and any parameters. Use strtok to break the lines in it's elements.
if (status == Status::REQUEST) // read the first line
{
  //Serial.print(F("lineBuffer="));Serial.println(lineBuffer);
  // now split the input
  char *ptr;
  ptr = strtok(lineBuffer, " ");          // strtok willdestroy the newRequest
  strlcpy(method, ptr, smallbuffersize);
  Serial.print(F("method=")); Serial.println(method);
  ptr = strtok(NULL, " ");
  strlcpy(uri, ptr, smallbuffersize);
  if (strchr(uri, '?') != NULL)
  {
    ptr = strtok(uri, "?");               // split URI from parameters
    strcpy(uri, ptr);
    ptr = strtok(NULL, " ");
    strcpy(requestParameter, ptr);
    Serial.print(F("requestParameter=")); Serial.println(requestParameter);
  }
  Serial.print(F("uri=")); Serial.println(uri);
The empty line can be recognized with a LF (line feed) in the first 2 characters. Be carefully: HTTP should send CR+LF after each header-request field.
      else if (status > Status::REQUEST && i < 2) // check if we have an empty line
      {
        status = Status::BODY;
      }
The parameters in the body can be splitted with strtok. If you are using very simple unique names, you can even split them with a simple strncmp.
      if ( strncmp( postParameter, "pinD", 4) == 0 ) {       // check the first 4 characters (= length of needle)
        byte pin = atoi(postParameter + 4);                  // Convert ASCII to byte from position 4 onwards
        //Serial.print(("pin=")); Serial.println(pin);
        const char * ptr = strchr(postParameter, '=');       // get a pointer to the first occurance of '='
        if (ptr != NULL)                                     // only continue when postParameter contains '='
        {
          size_t pos = ptr - postParameter +1;               // calculate from the pointer adress to the absolute position within postParameter
          if ( strncmp( postParameter + pos, "On", 2) == 0 ) {
            digitalWrite(pin, 1);
          }
          else if ( strncmp( postParameter + pos, "Off", 3) == 0 ) {
            digitalWrite(pin, 0);
          }
        }
      }
Depending on the button you press, the GPIO pin will be switched on or off.
Don't forget - the browser is still waiting for an answer of the webserver. In the example the server should response to the browser a new - updated - page. For usual the comparison for the page "/" should be enough, but we could also add "/index.htm" as valid page. In other words, the webserver will send the same page regardless if / or index.htm was requested:
 // send back a response

if (!strcmp(uri, "/") || !strcmp(uri, "/index.htm"))
  sendPage(client);
Perfect! But... if the user enters a wrong URI, the browser will get no answer and will run into a timeout. Therefore we have to handle this case with a simple HTTP-Error 404 page. Let's add an else to our if:
else
  send404(client);
and generate a simple page: sending a response code 404 (for the browser) and an explanation for the user:
void send404(EthernetClient &client)
{
  client.println("HTTP/1.0 404 Not Found\r\n"
                   "Content-Type: text/plain\r\n"
                   "\r\n"
                   "File Fot Found\n");
  client.stop();
}
As an example - we are sending a simple text/plain page - without any HTML tags. But it is up to you to send HTTP also.
More pages on the Arduino UNO Webserver
If you want to serve more pages on your webserver just repeat the steps:
- define a function which serves the page
- add more pages to the if statement which handels the URI
else if (!strcmp(uri, "/1.htm")
In the end you will get a nice working webserver on your Arduino UNO.
Handling the favicon.ico with the Arduino Webserver
Don't forget the favicon.ico. Currently our Arduino webserver responses requests for the favicon.ico like following:
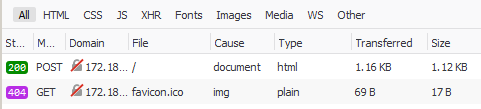
The server will get a valid 404-error. Let's see how we could do improve this. Its already a lot less transfered bandwith than sending the same page twice.
As we learned already, the first step is to add a new handler in our URI if:
else if (!strcmp(uri, "/favicon.ico")) // a favicon
  send204(client);
The HTTP-Response 204 informs the browser, that our webserver has received the request successfully, but doesn't return any data. You just need two lines of code:
void send204(EthernetClient &client) {
  client.println("HTTP/1.0 204 no content\r\n");
  client.stop();
}
And now you even see a perfect green OK in your browsers netmonitor:
IMHO is response code 204 a very good solution for the limited resources on an Arduino UNO webserver. Again smart and simple while keeping an eye on RAM and flash usage.
If you want to read how to serve a favicon.ico on the Arduino webserver, you might read my page Arduino Webserver with favicion.ico
Avoiding the Retransmission of POST Data - PRG Pattern
When you have posted data from the browser to the server and try to reload the page, the browser will inform you that data will be retransmitted. The common way to avoid this behaviour is the PRG Pattern for a "POST REDIRECT GET". When the browser submits data with POST, the server will not just answer with (updated) HTML output, but redirect the browser to a new location. In our example the server will redirect the browser to the requested page. As the redirect will be performed by the browser as GET request, such a browser refresh will cause no retransmission of data.
So before we send back a response to the client, we need to check if the transmission method was POST and if so - send a redirect to the browser:
       // send back a response
      if (!strcmp(method, "POST")) {             // PRG Pattern - see https://en.wikipedia.org/wiki/Post/Redirect/Get
        send303(client, uri);                    // redirect browser to send a GET Request
      }
      else if (!strcmp(uri, "/") || !strcmp(uri, "/index.htm"))        // the homepage
        sendPage(client);
      else if (!strcmp(uri, "/favicon.ico"))     // a favicon
        send204(client);                         // if you don't have a favicon, send 204
      else                                       // if the page is unknown, HTTP response code 404
        send404(client);
Summary
You have learned how to set up a minimalistic webserver on an Arduino UNO, how to serve different kind of data on the UNO and how to POST data to the Arduino. Your webserver handles requests correctly and answers wrong requests with HTTP-Code 404 or any other code you define in the code. Finally you can even handle the favicon.ico correctly for the browser.
If you have any questions to the Arduino Webserver - best place to ask is in the Arduino.cc forum.